
Foodify - Restaurant Management SaaS with POS, KDS, QR Menu Ordering & Laravel Admin
Launch your own restaurant management platform with Foodify, built-in tools for POS billing, kitchen display, QR table ordering, delivery, multi-branch control, and subscription plans. Ideal for single outlets to growing chains, it simplifies operations & boosts revenue.
Basic Knowledge
To install, set up, and publish Foodify with your branding, it's necessary to possess fundamental knowledge in server-side configuration.
- IDE for Web development, we prefer VSCode.
- Real server related knowledge like apache or local machine server, we prefere to use a real server.
- Server related knowledge and we preferred cPanel in your server for quick installation
- Basic knowledge in PHP, NPM, Vue, Node and Laravel.
- Basic knowledge about firebase
Server Prerequisite
Foodify is dependent on PHP version 8.2 or higher and MySQL version 8.0 or later. Additionally, the following server configurations and PHP extensions are necessary. Before install, please make sure you have the components bellow enable on your server
- PHP 8.2 or Greater
- OpenSSL PHP Extension
- PDO PHP Extension
- Mbstring PHP Extension
- Tokenizer PHP Extension
- PHP JSON
- PHP cURL
- XML PHP Extension
- Ctype PHP Extension
- BCMath PHP Extension
- PHP Zip Archive
- Exif PHP Extension
- Fileinfo PHP Extension
- GD PHP Extension
- Intl PHP Extension
- Imagick PHP Extension
Typically, these extensions are enabled by default on most servers, but it is recommended that you confirm with your hosting provider.
Please proceed with caution and take great care in completing this task. Any errors made will not be the responsibility of our team.
cPanel Database Setup and File Configuration
php.ini Requirements:
open_basedir must be disabled
Note: Remember! The script doesn't have any "install" folder or directory. The installation is controlled by a Controller.
Now Follow the steps below to setup the script:
- Unzip the package you received after purchase and open the Source Code folder. You will find the web folder. In web folder there is the foodify.zip file. you need to upload foodify.zip file to your hosting web server using FTP or cPanel, then you need to unzip this file, you will find "foodify" folder. You need to move all files and folders in your domain's document root directory.
- You will have these files and folders in your document root:
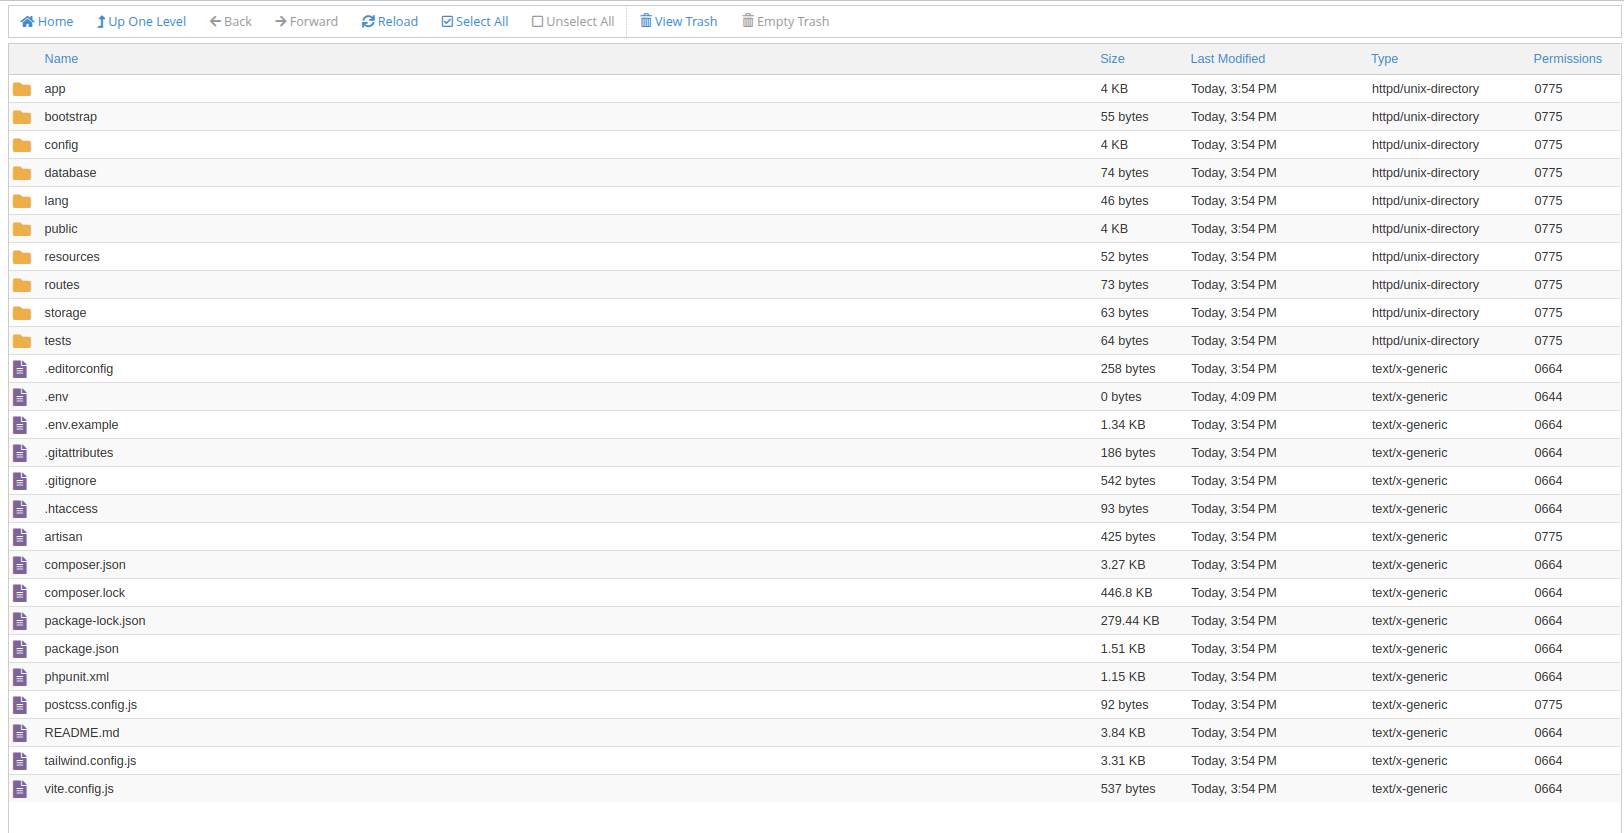
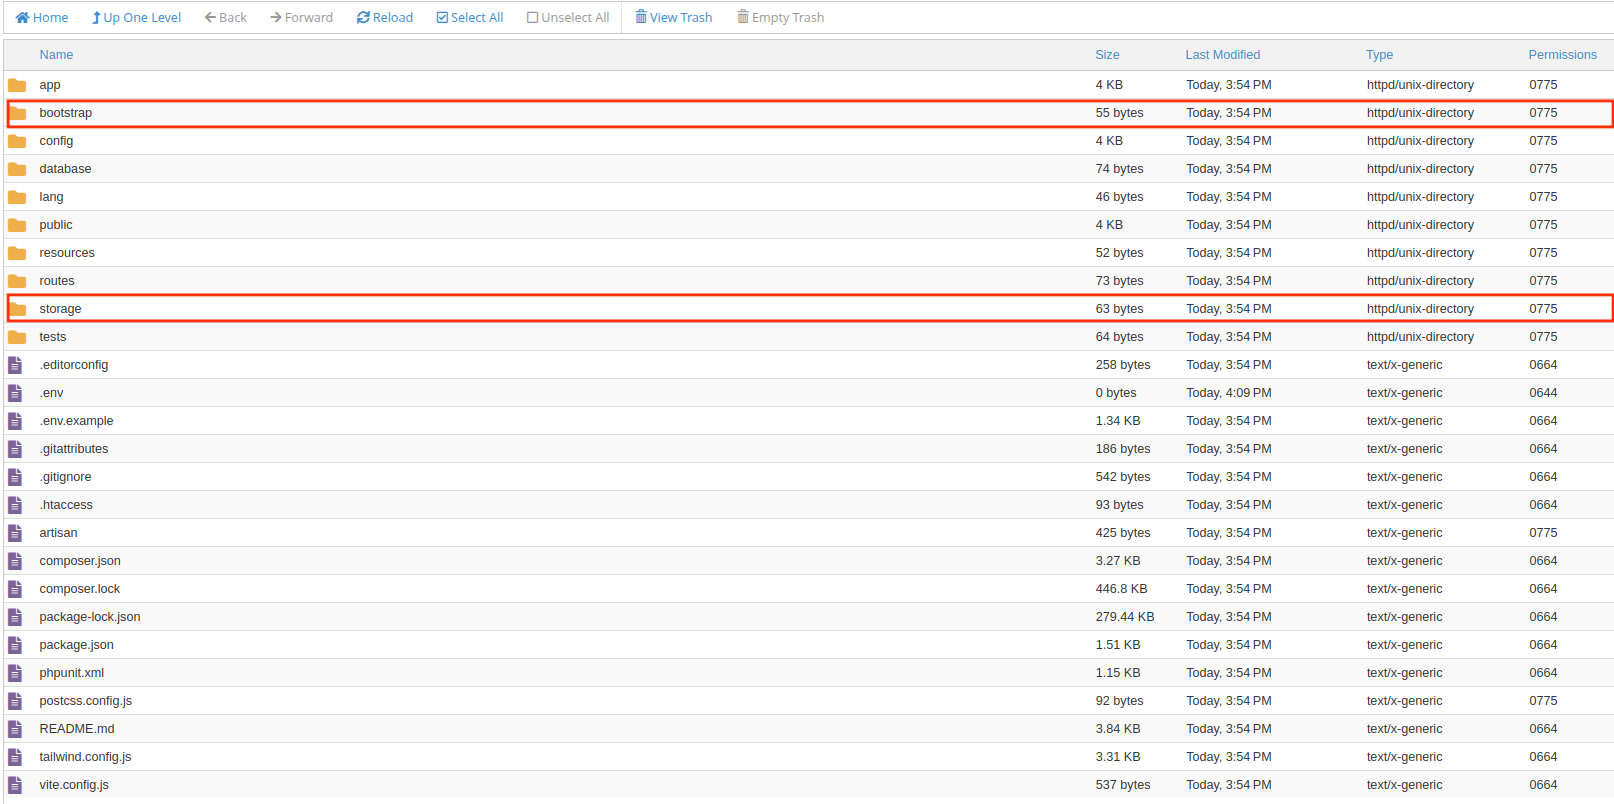
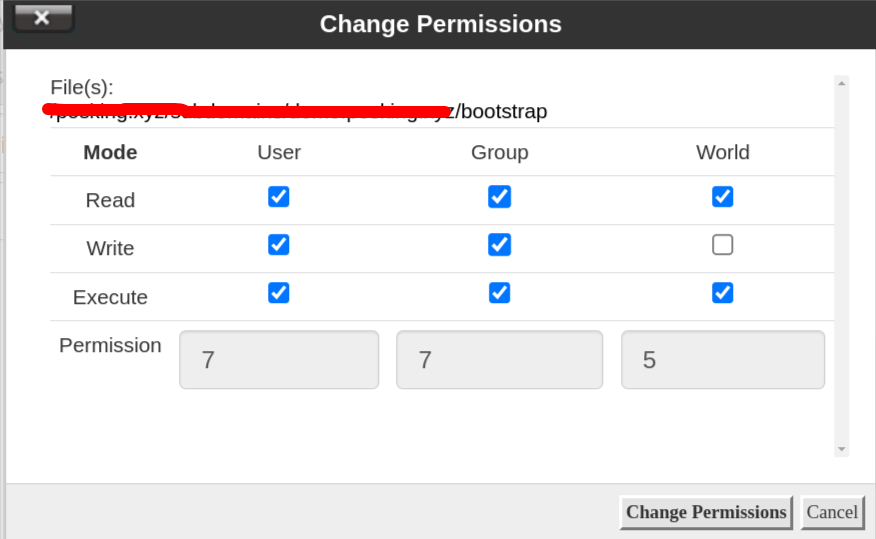
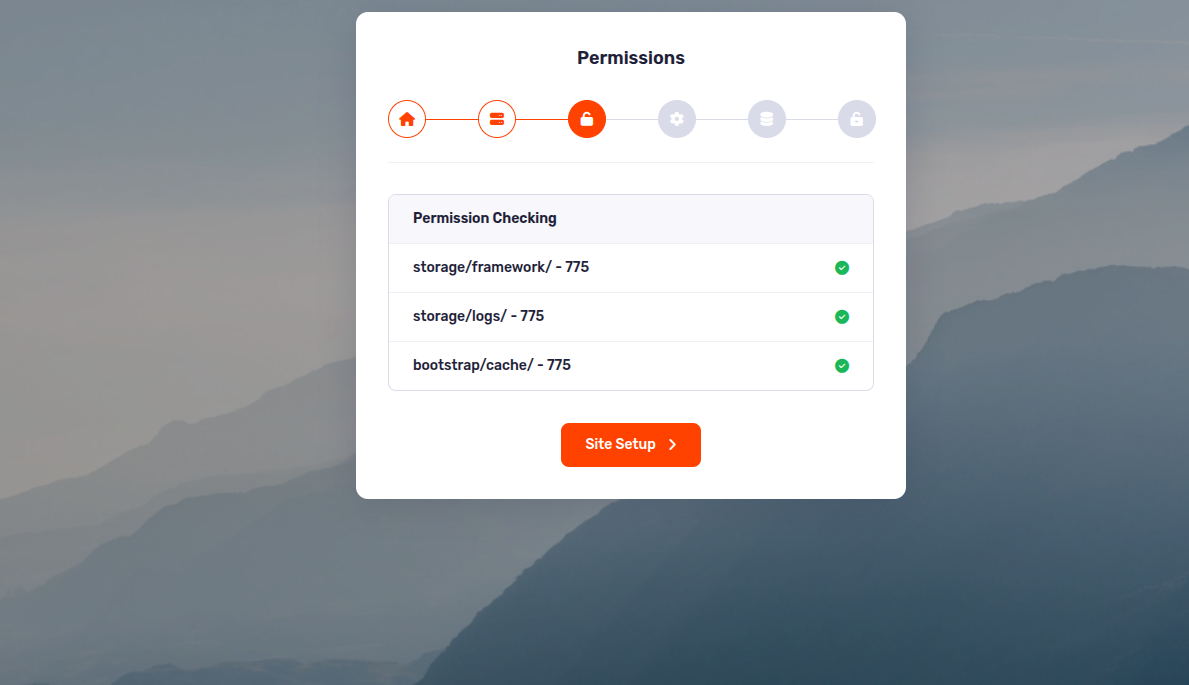
- Make sure /bootstrap/cache, /storage/framework and /storage/logs folder have permission as 755
recursively. If you don't have 755
permission in these folders, you have to give permission manually. To give permission right click on
the folder and click "Change permission" button, you will see the prompt to change permission like the
second image below. Select the checkboxes you can see in the second image.
-
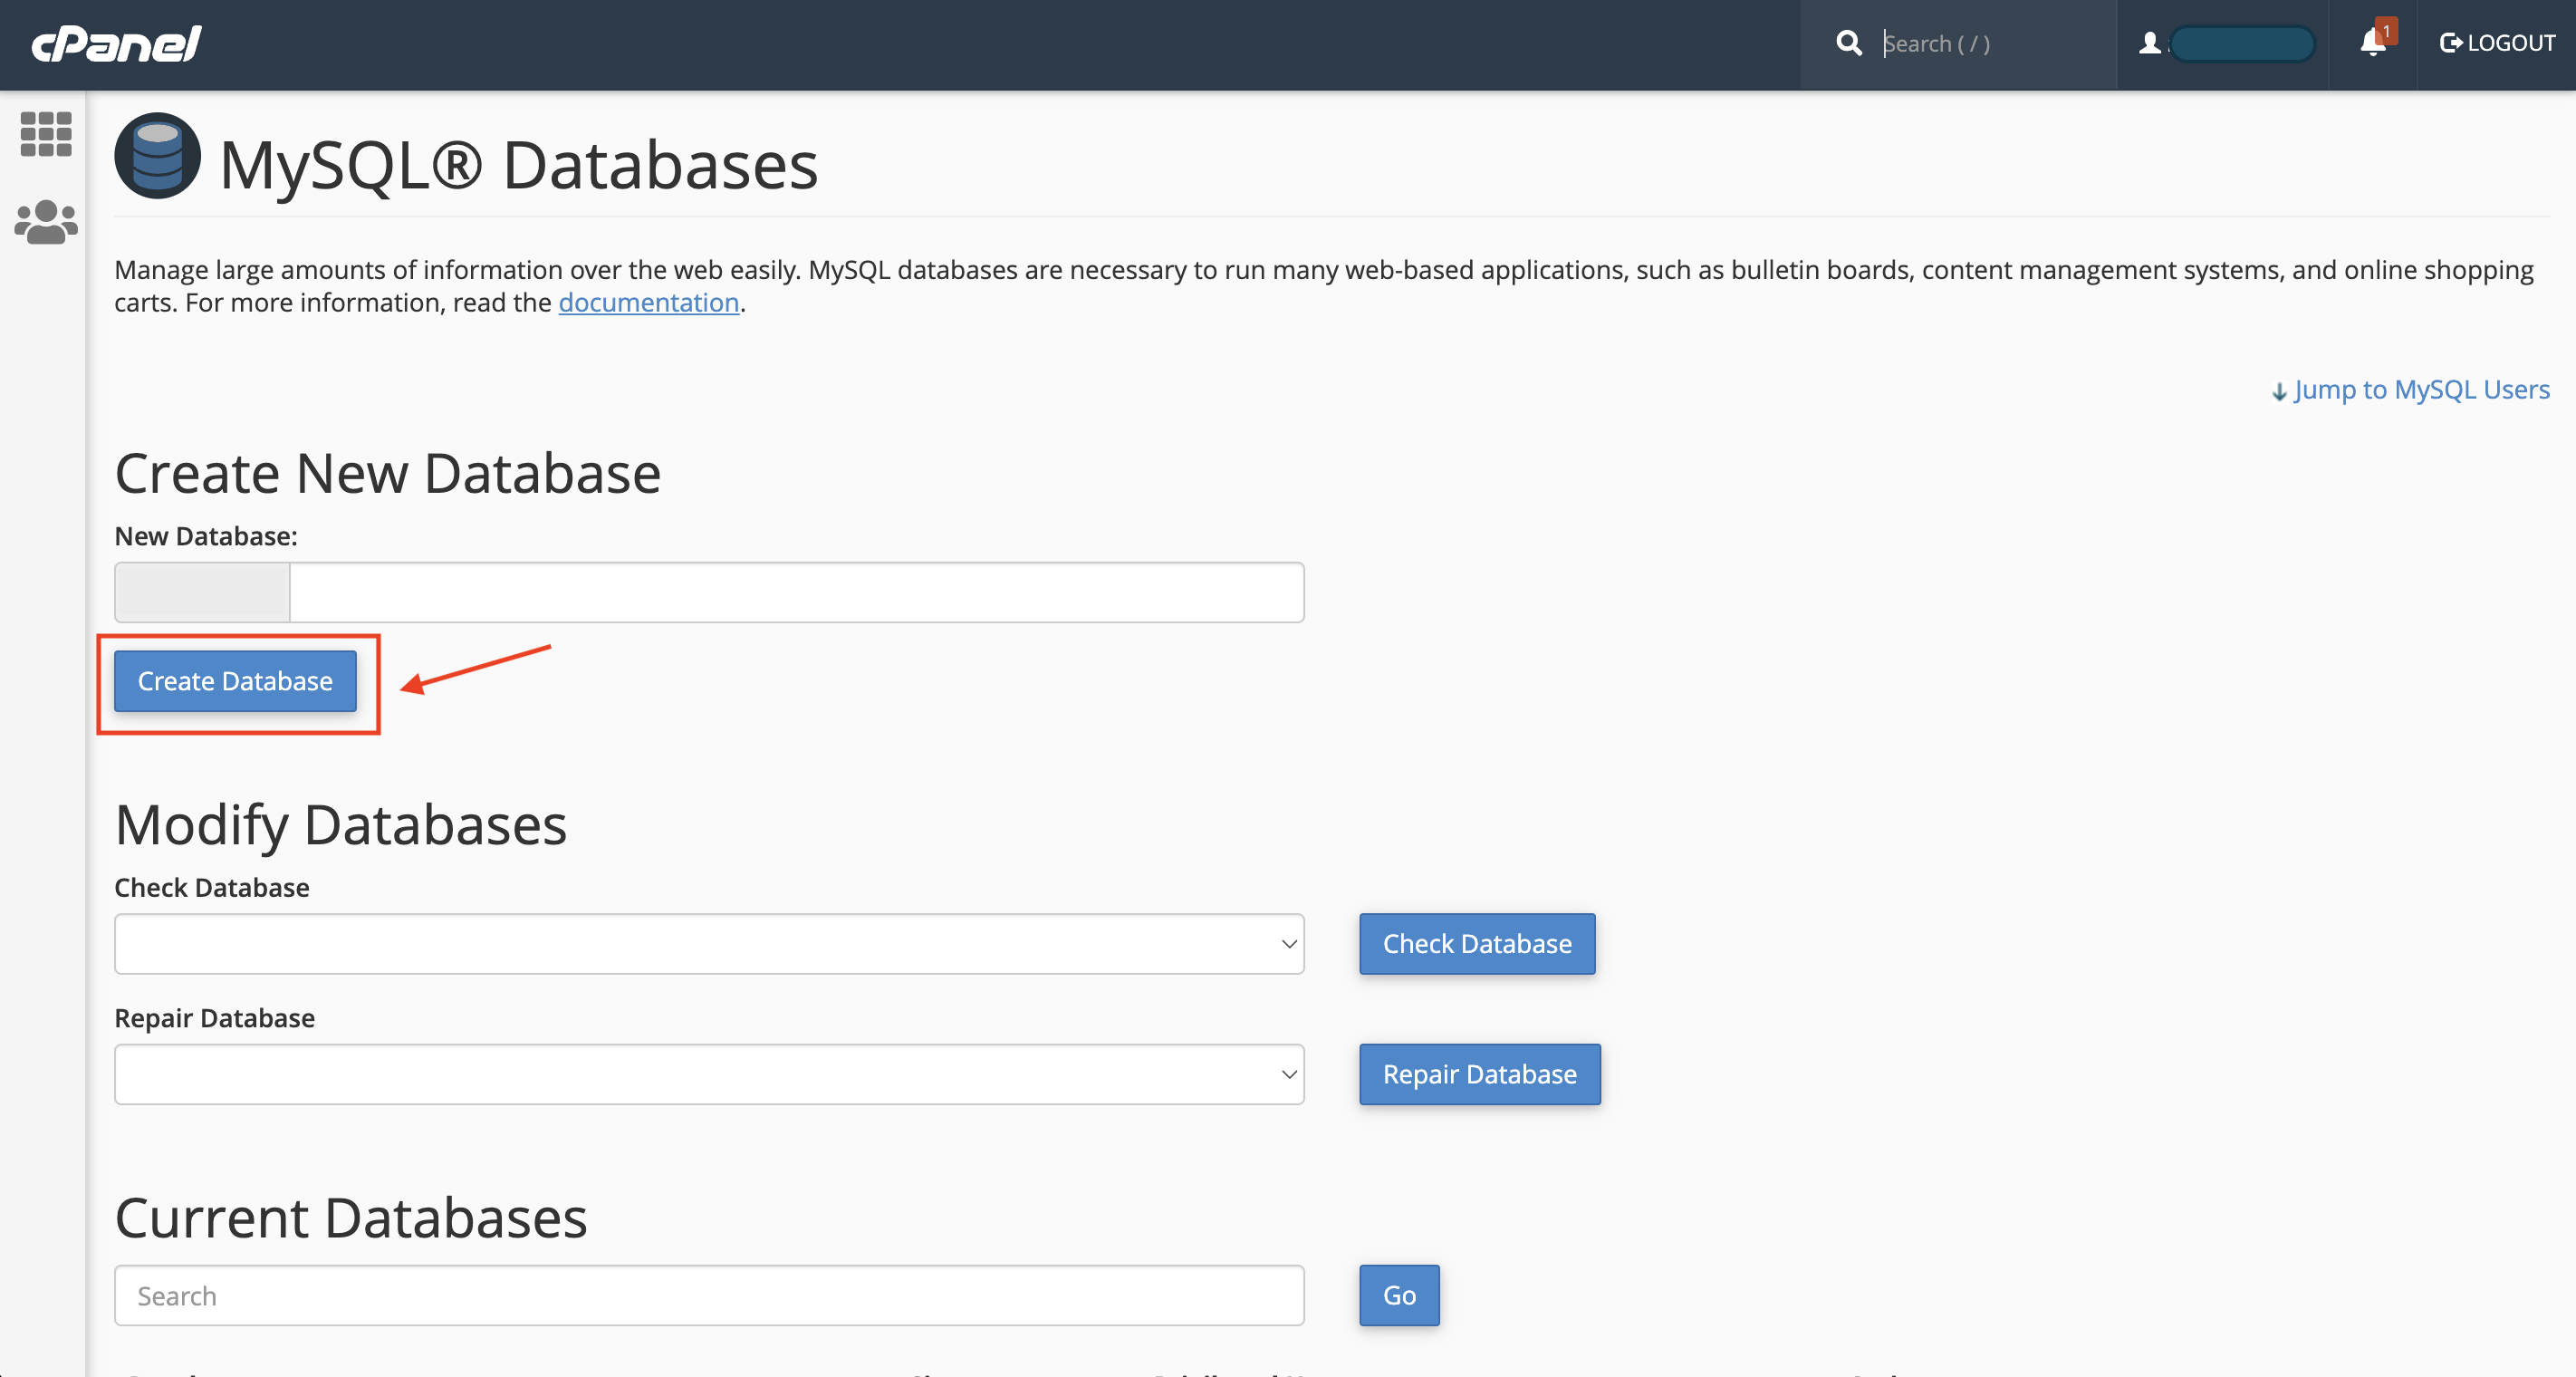
Before starting the installation, database must be configured for the application. For creating the
database, the following ways must be maintained
- From cPanel Go to MySQL Databases
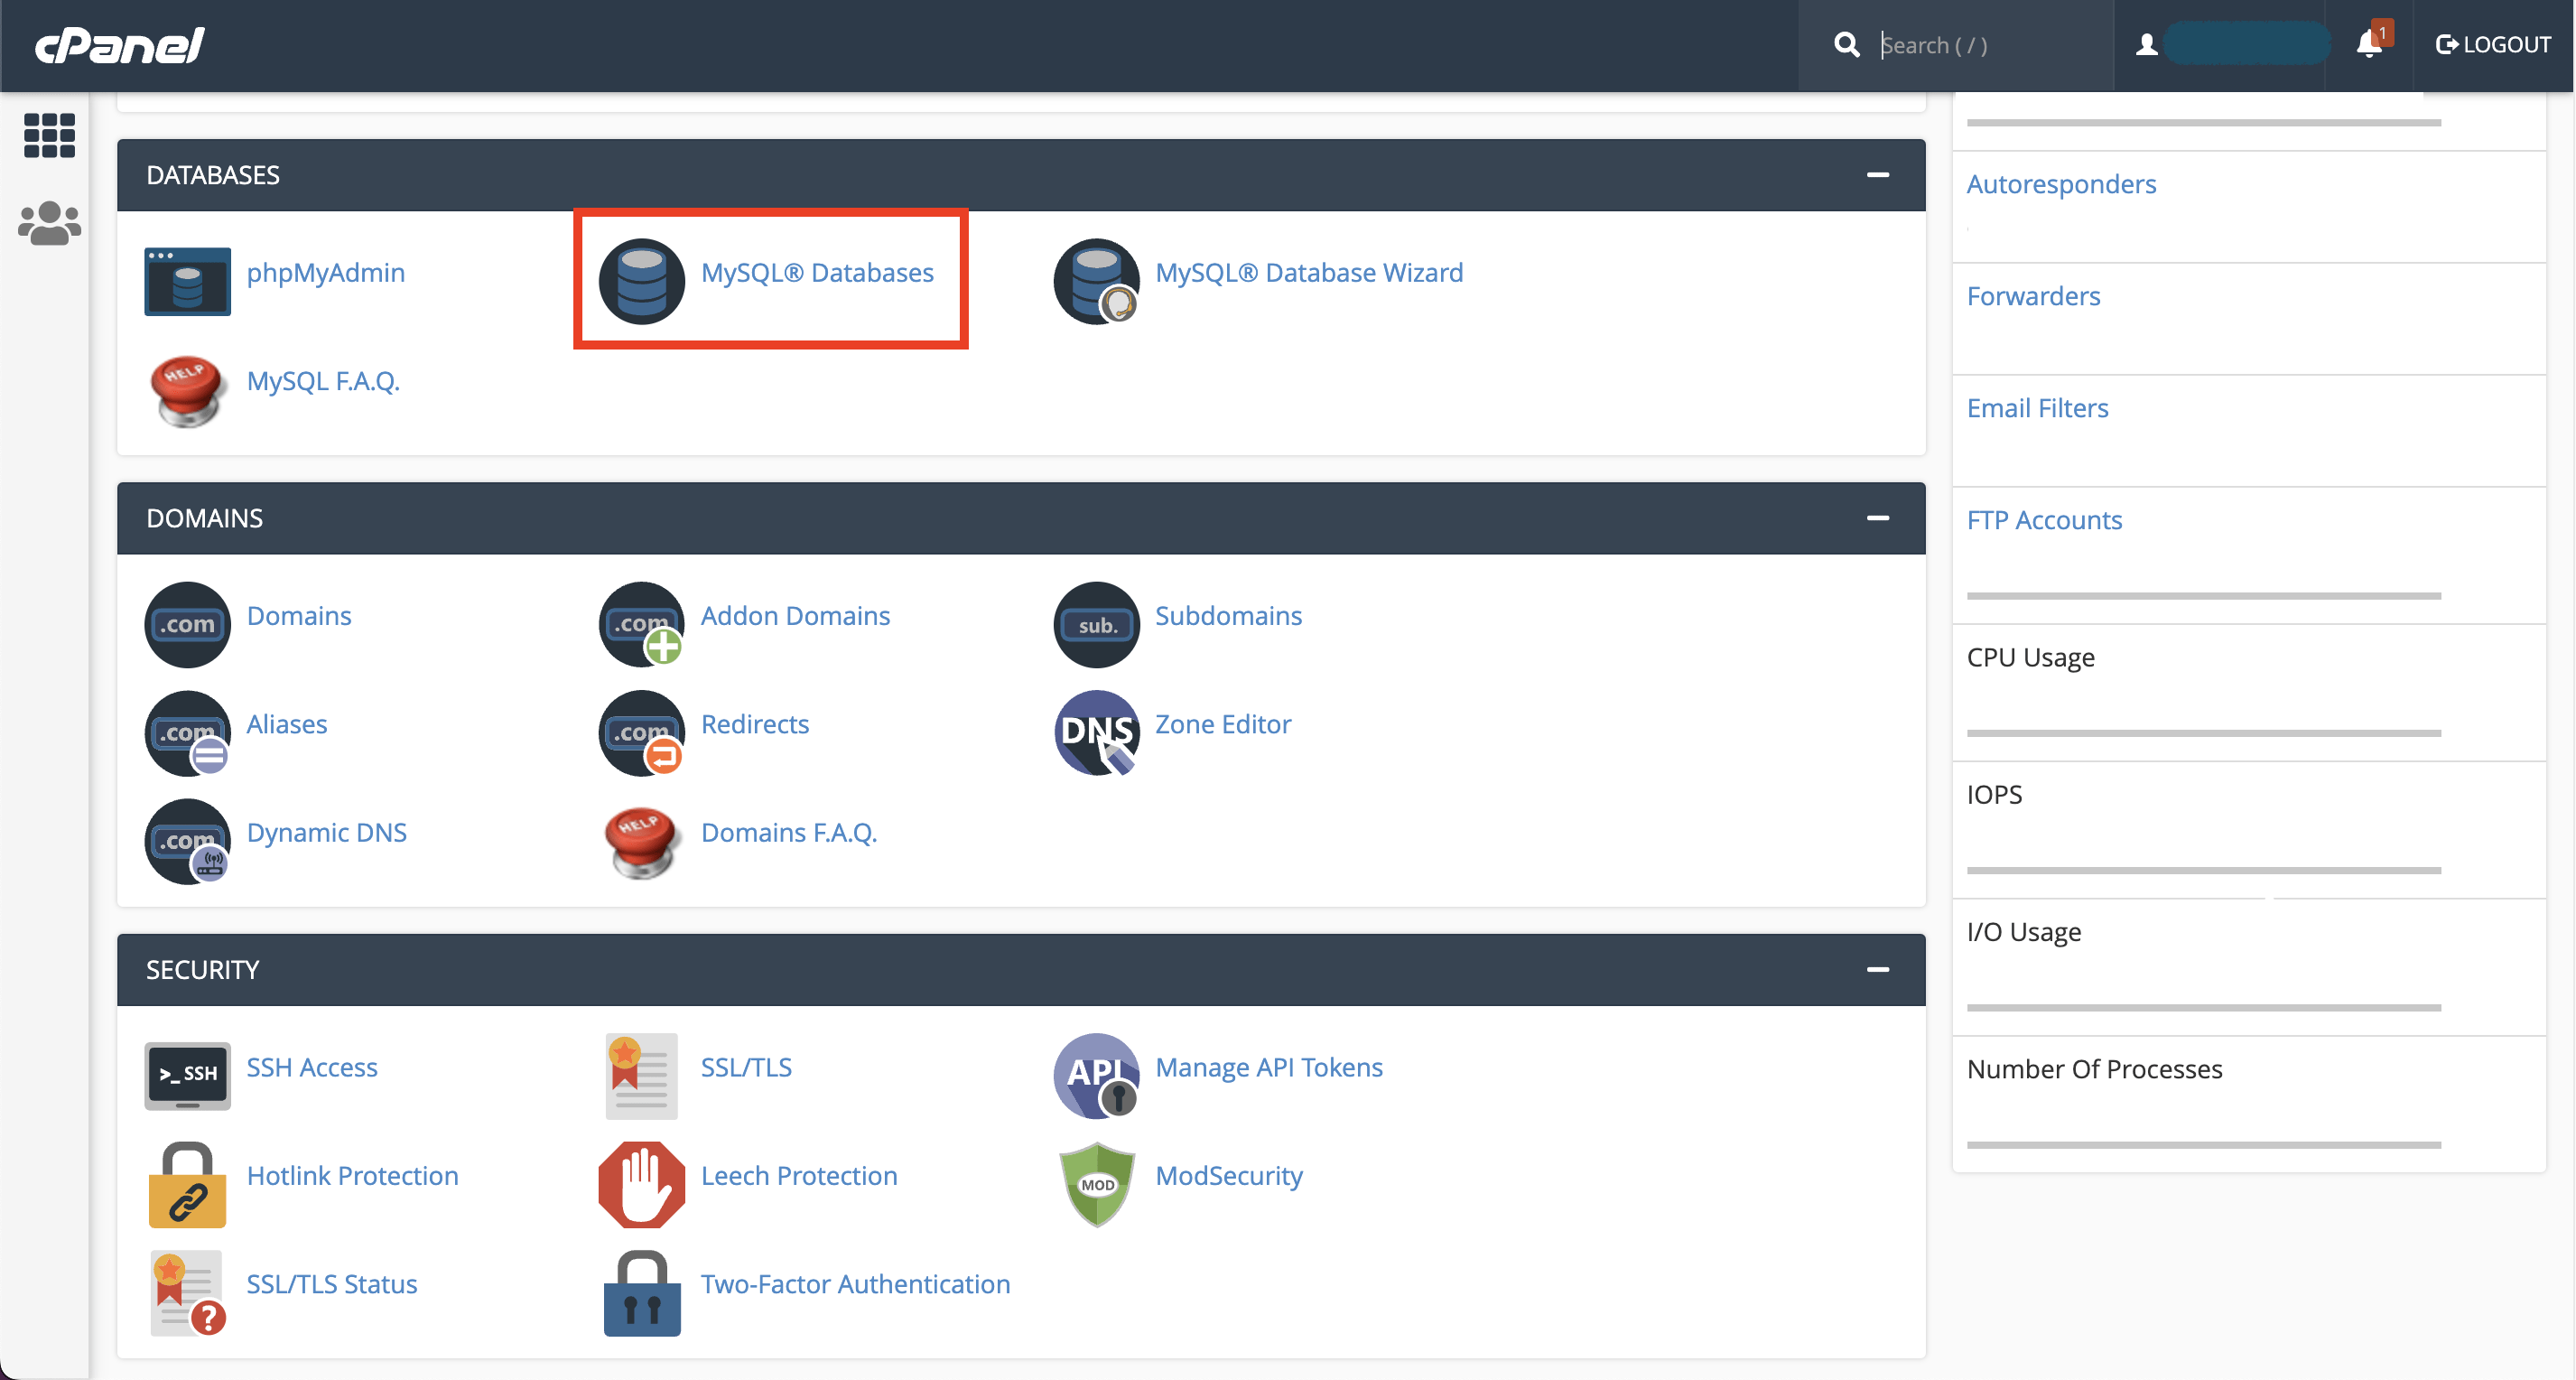
- Create a new database
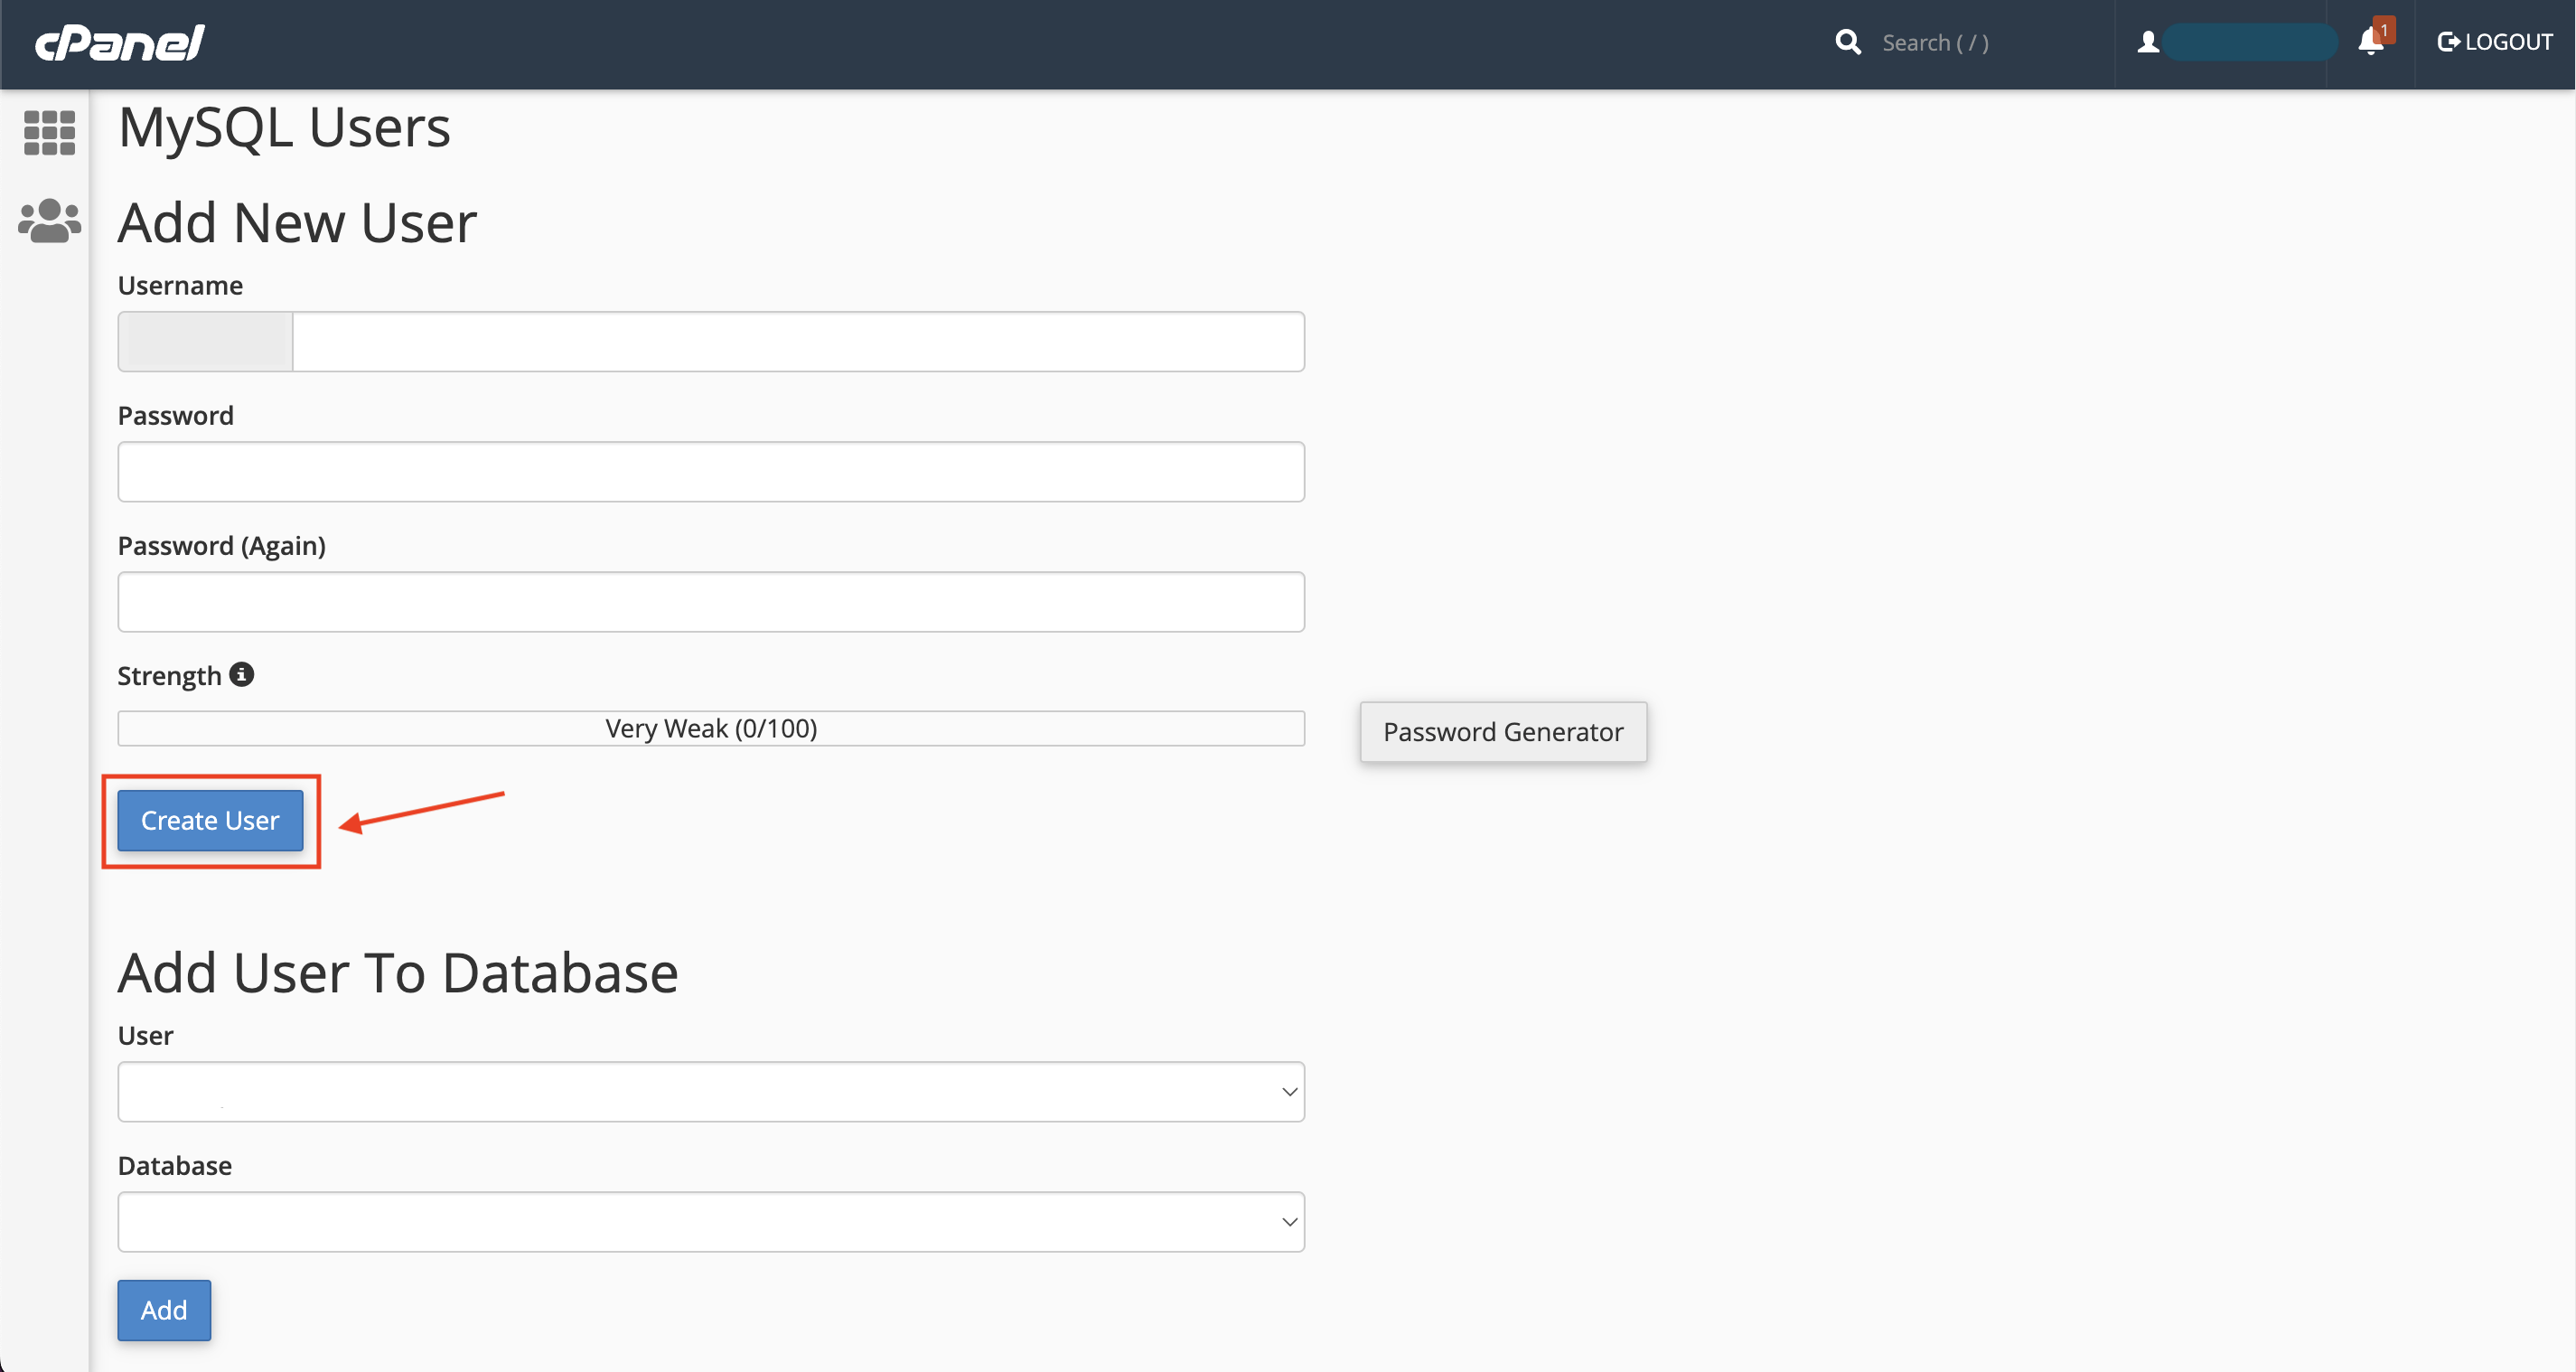
- Create a user for the database
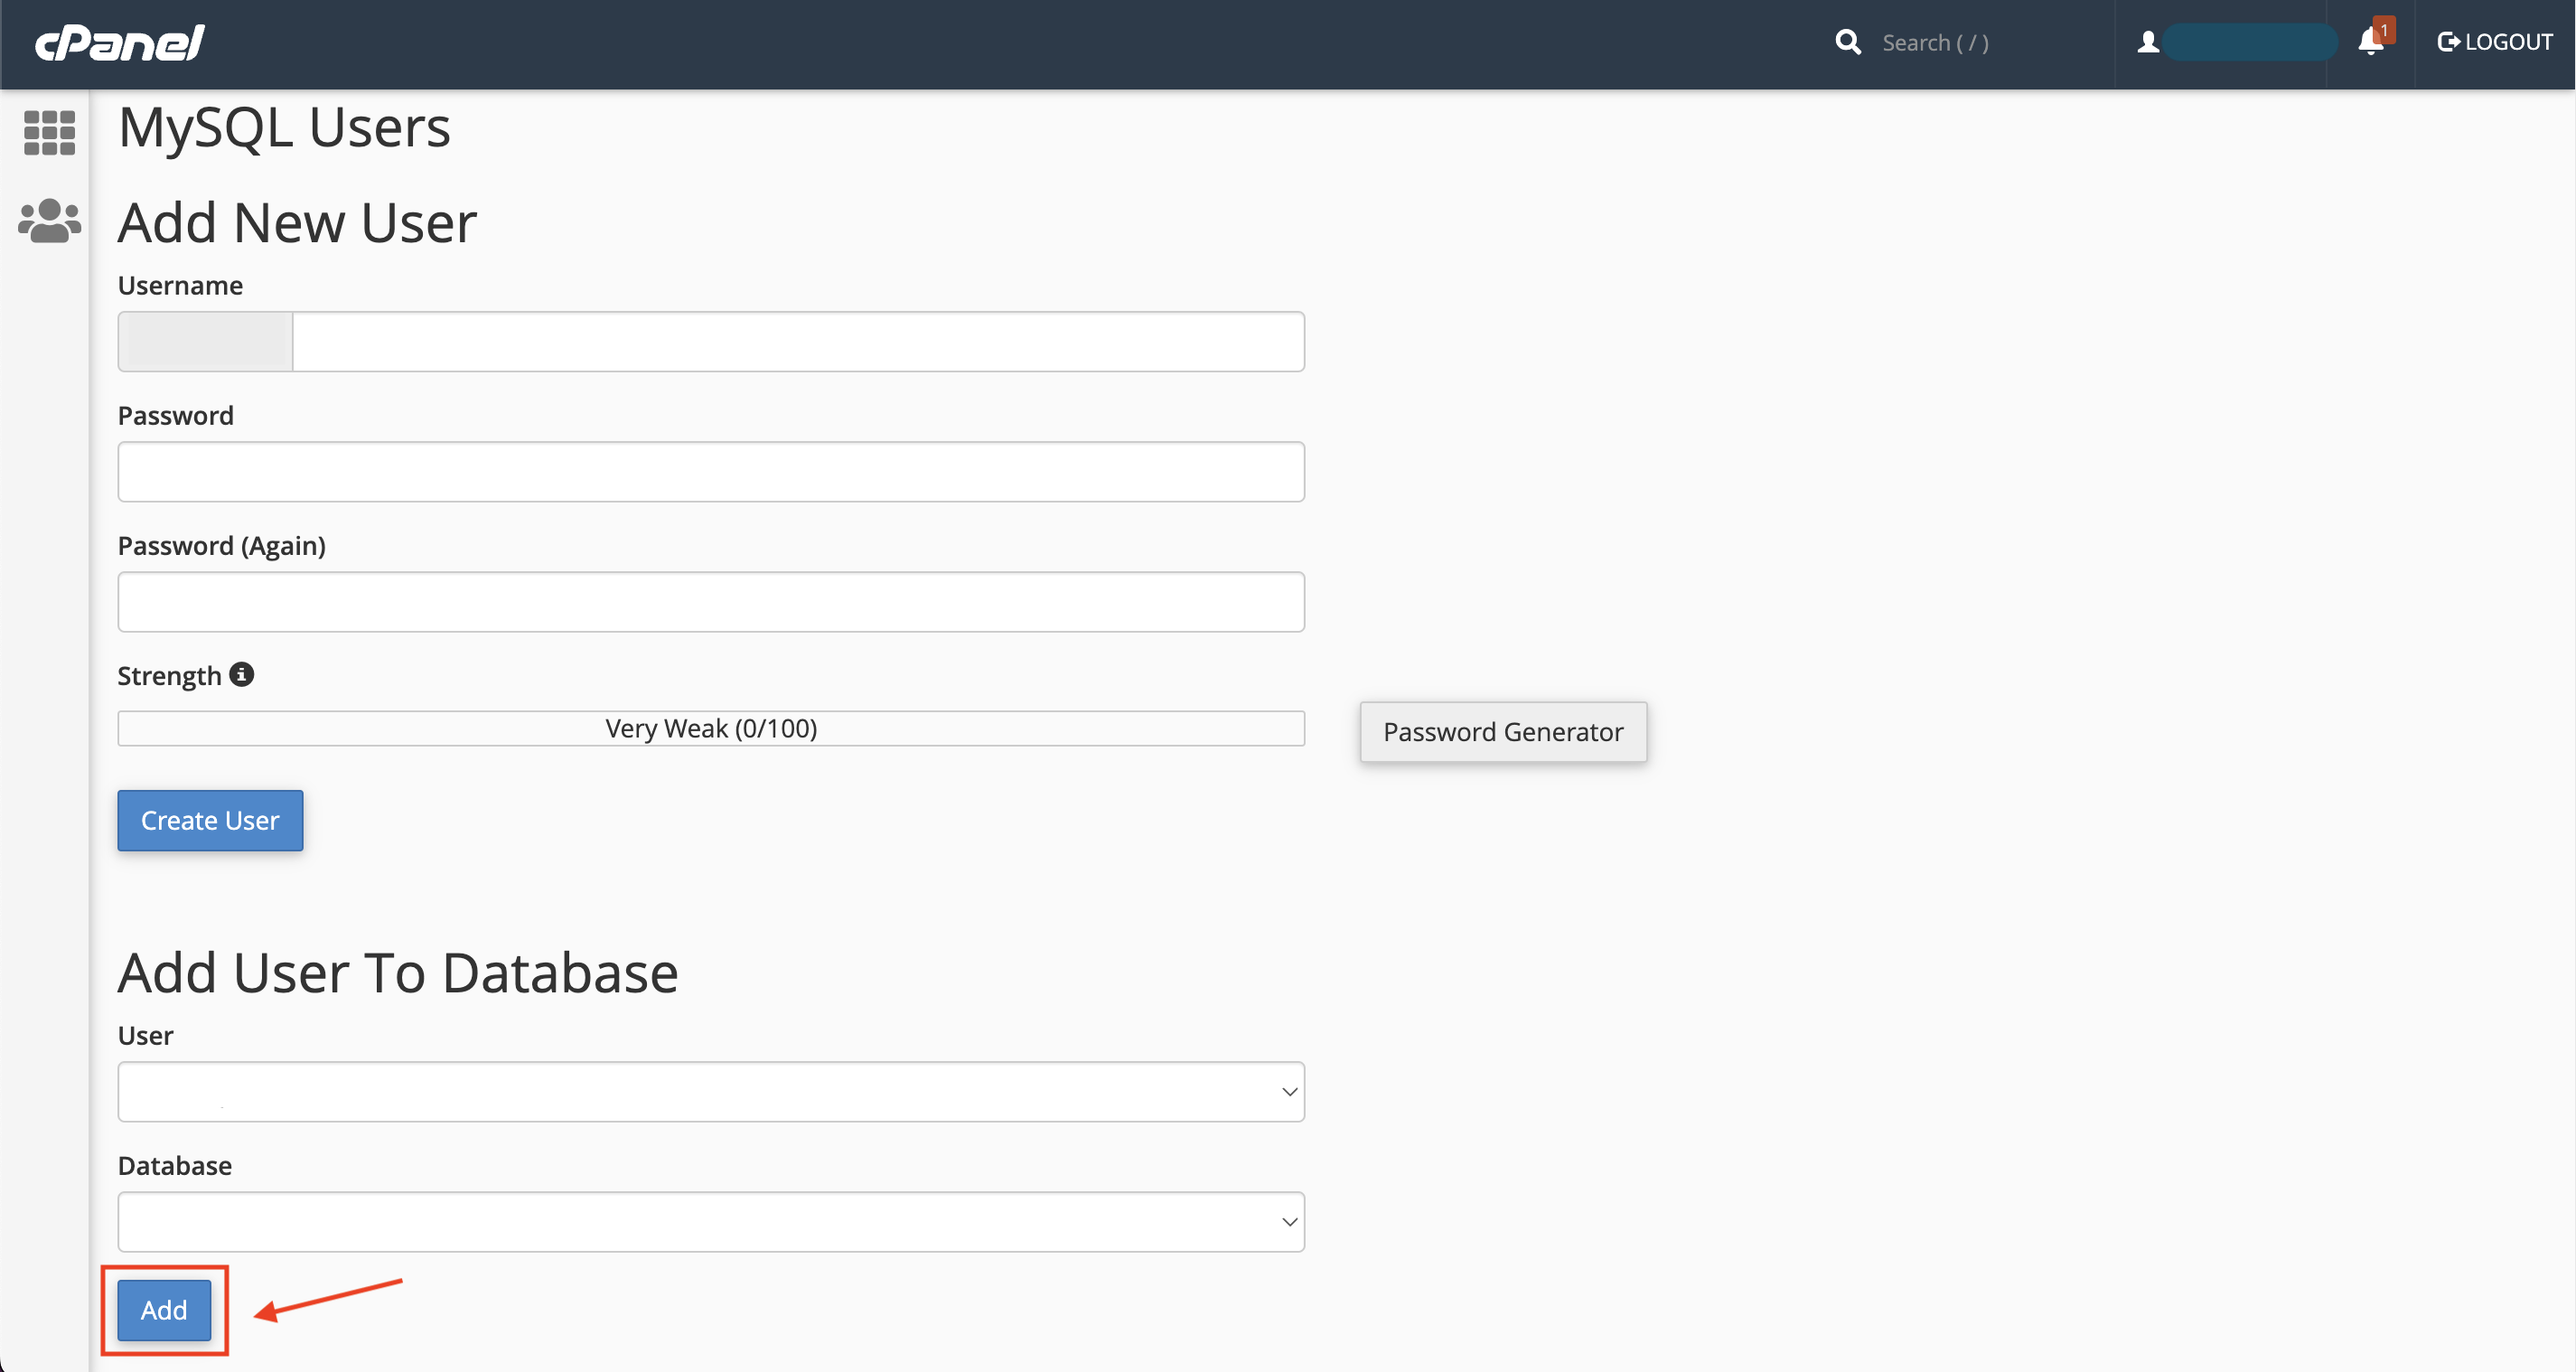
- Add a user to the database
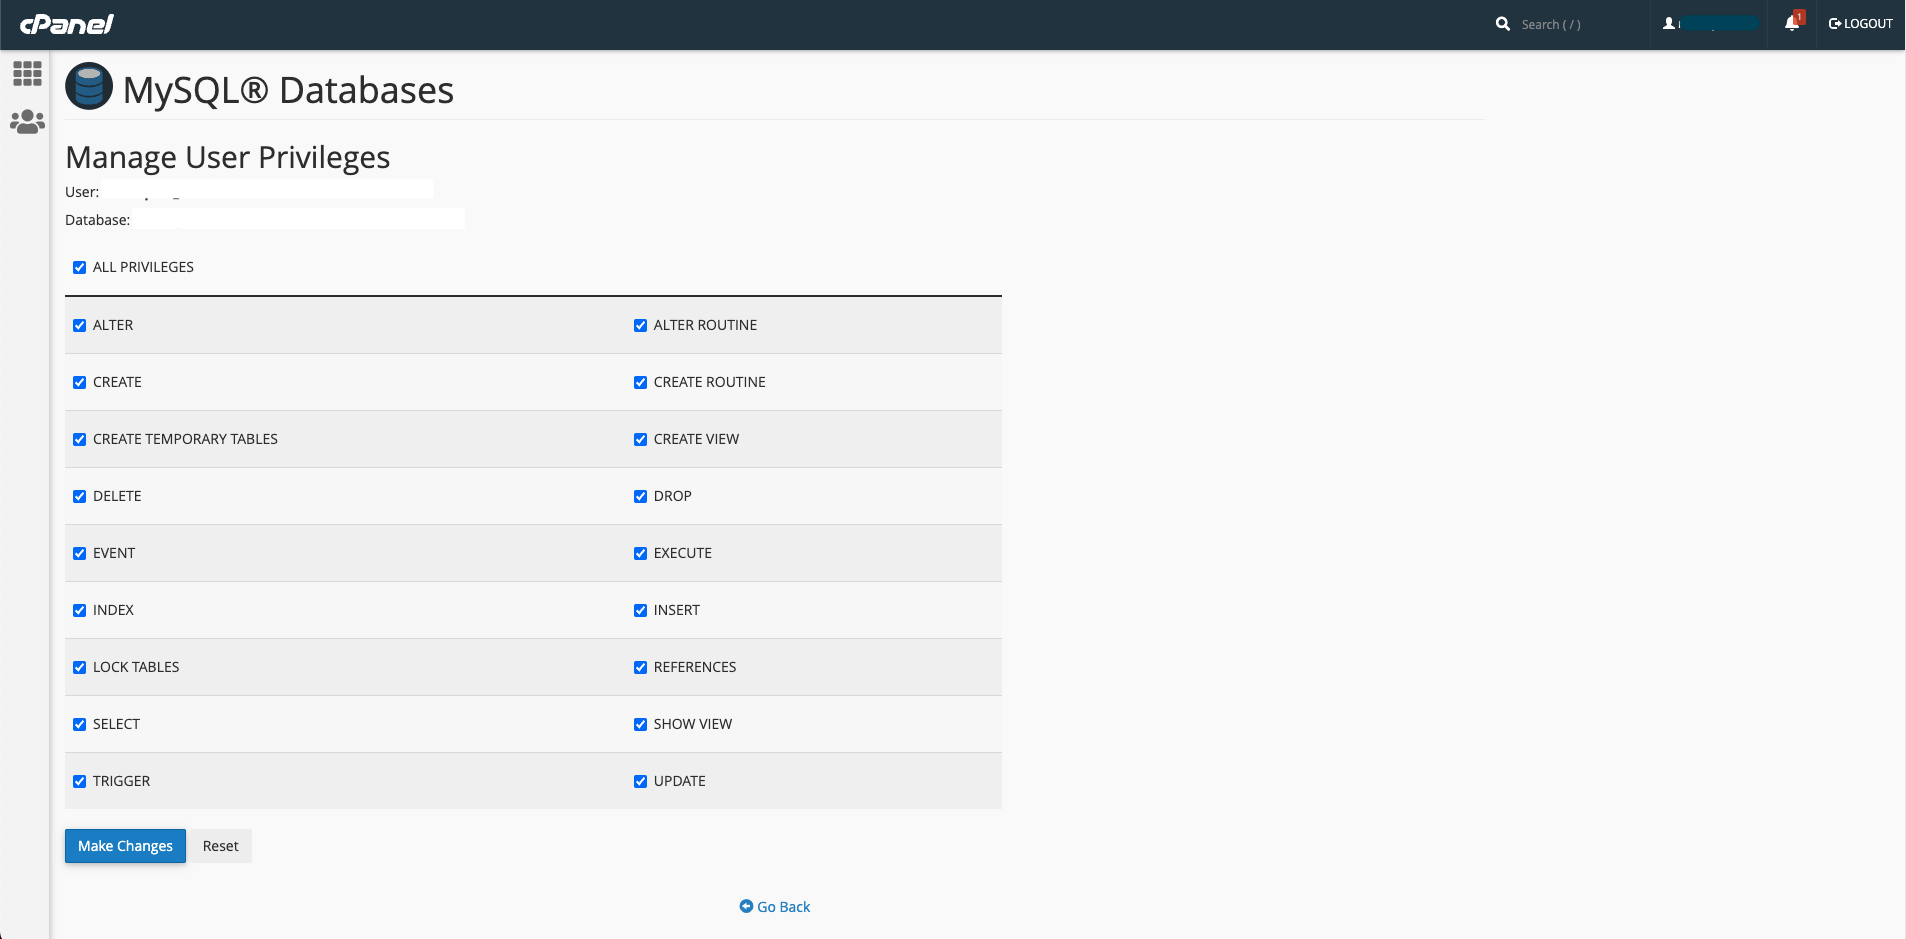
- Give privileges to the user
- From cPanel Go to MySQL Databases
Installation
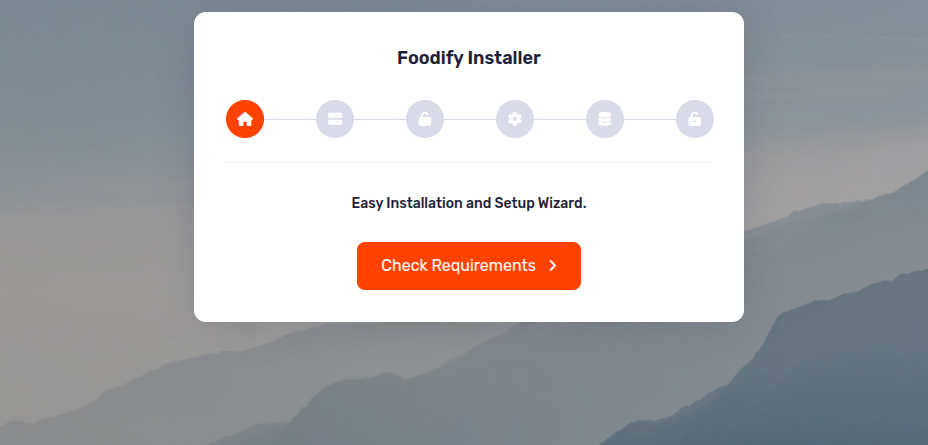
- Run the install script path from any web browser (http://yourdomain.com/install) and
click on “Check Requirements” button.
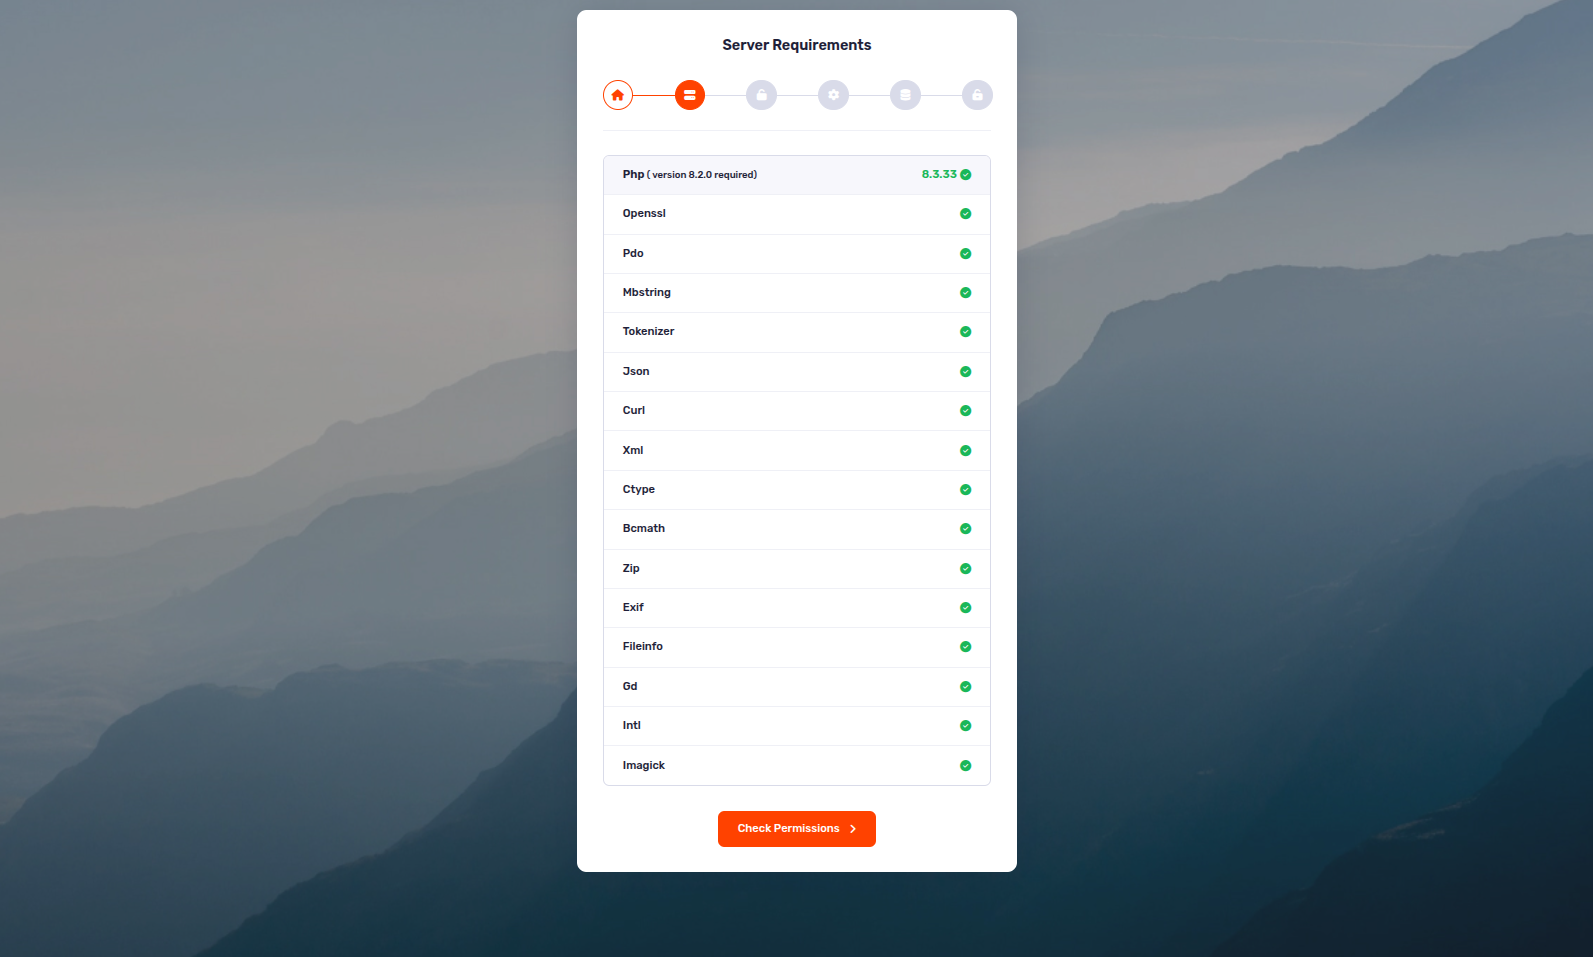
- Now you can see your php extension list if it is already installed in all extension then you can see
"Check Permissions" button. Now click on this button and go to next step
- Now you will see the folders permission list if everything is ok then click “License Setup”
- Provide your License Code, then click “Site Setup”
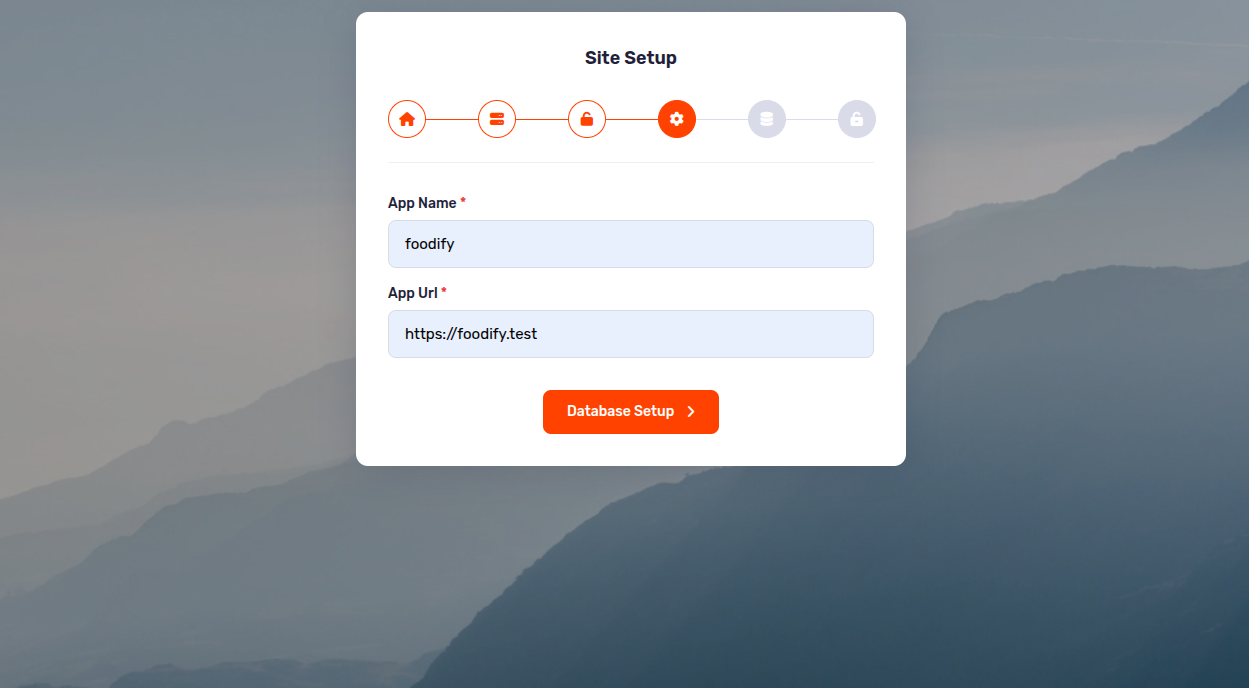
- Provide your App name and Domain name as App Url, then click “Database Setup”
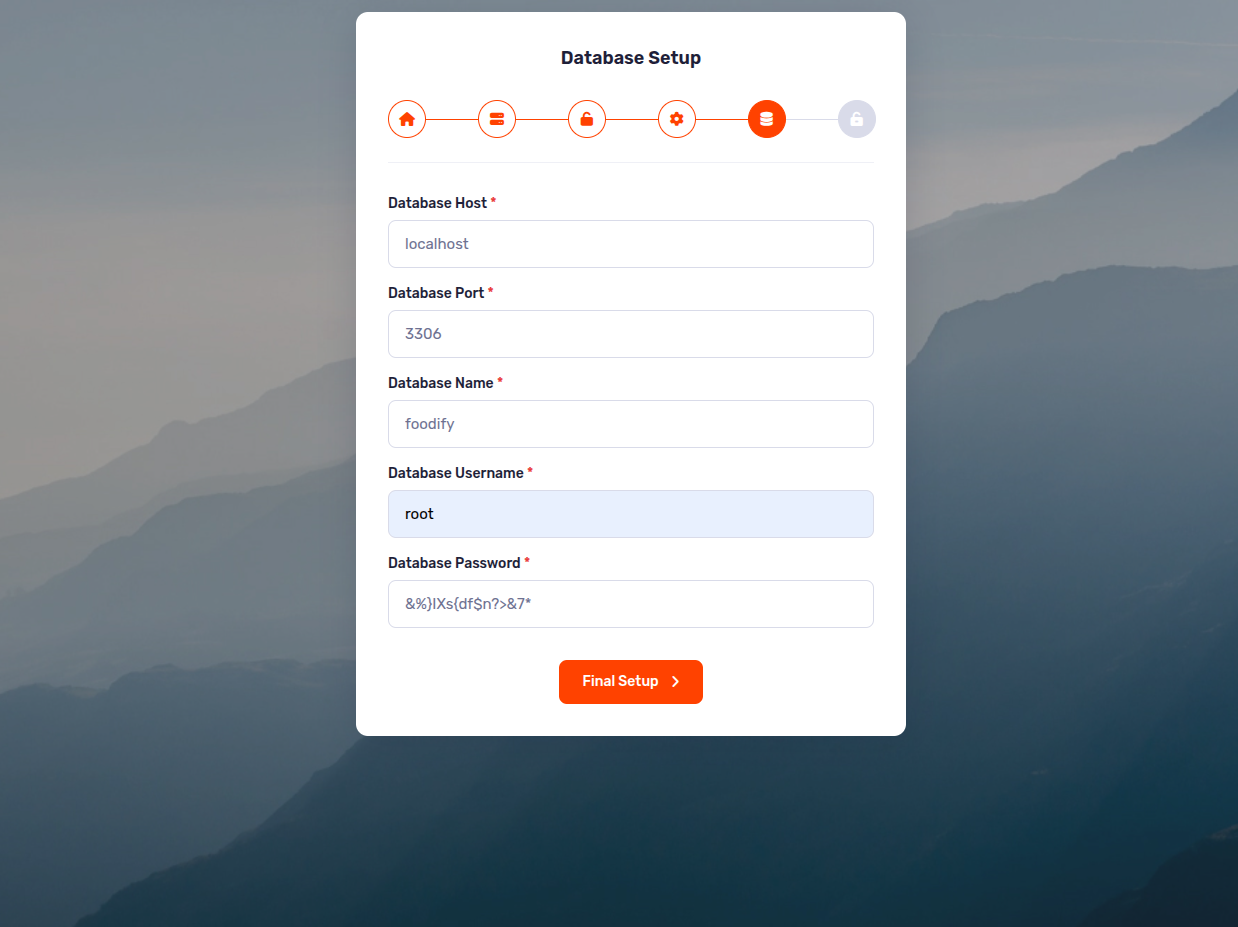
- Provide your database information like Database Host, Database Port, Database Name, Database Username,
and Database Password, then click “Final Setup”. Don't use # in your Database
Password.
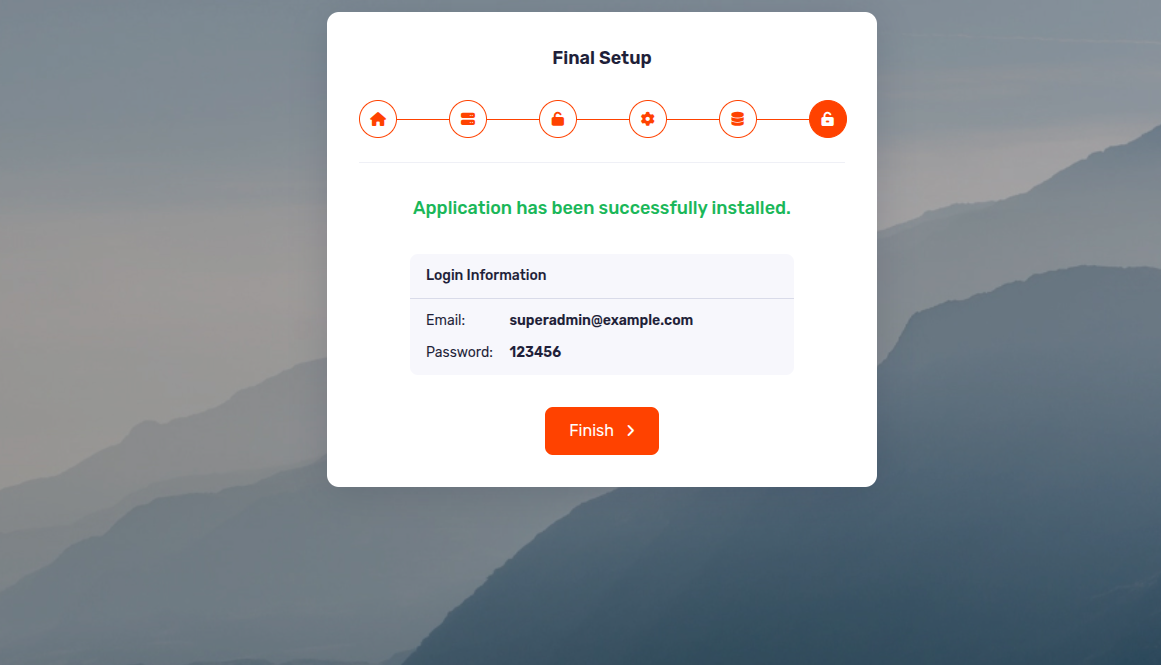
- Now you will see the login information (Email : superadmin@example.com, Password : 123456) then click
“Finish” to exit
- Good Luck!!!
Tips Check our video tutorial! Watch Now
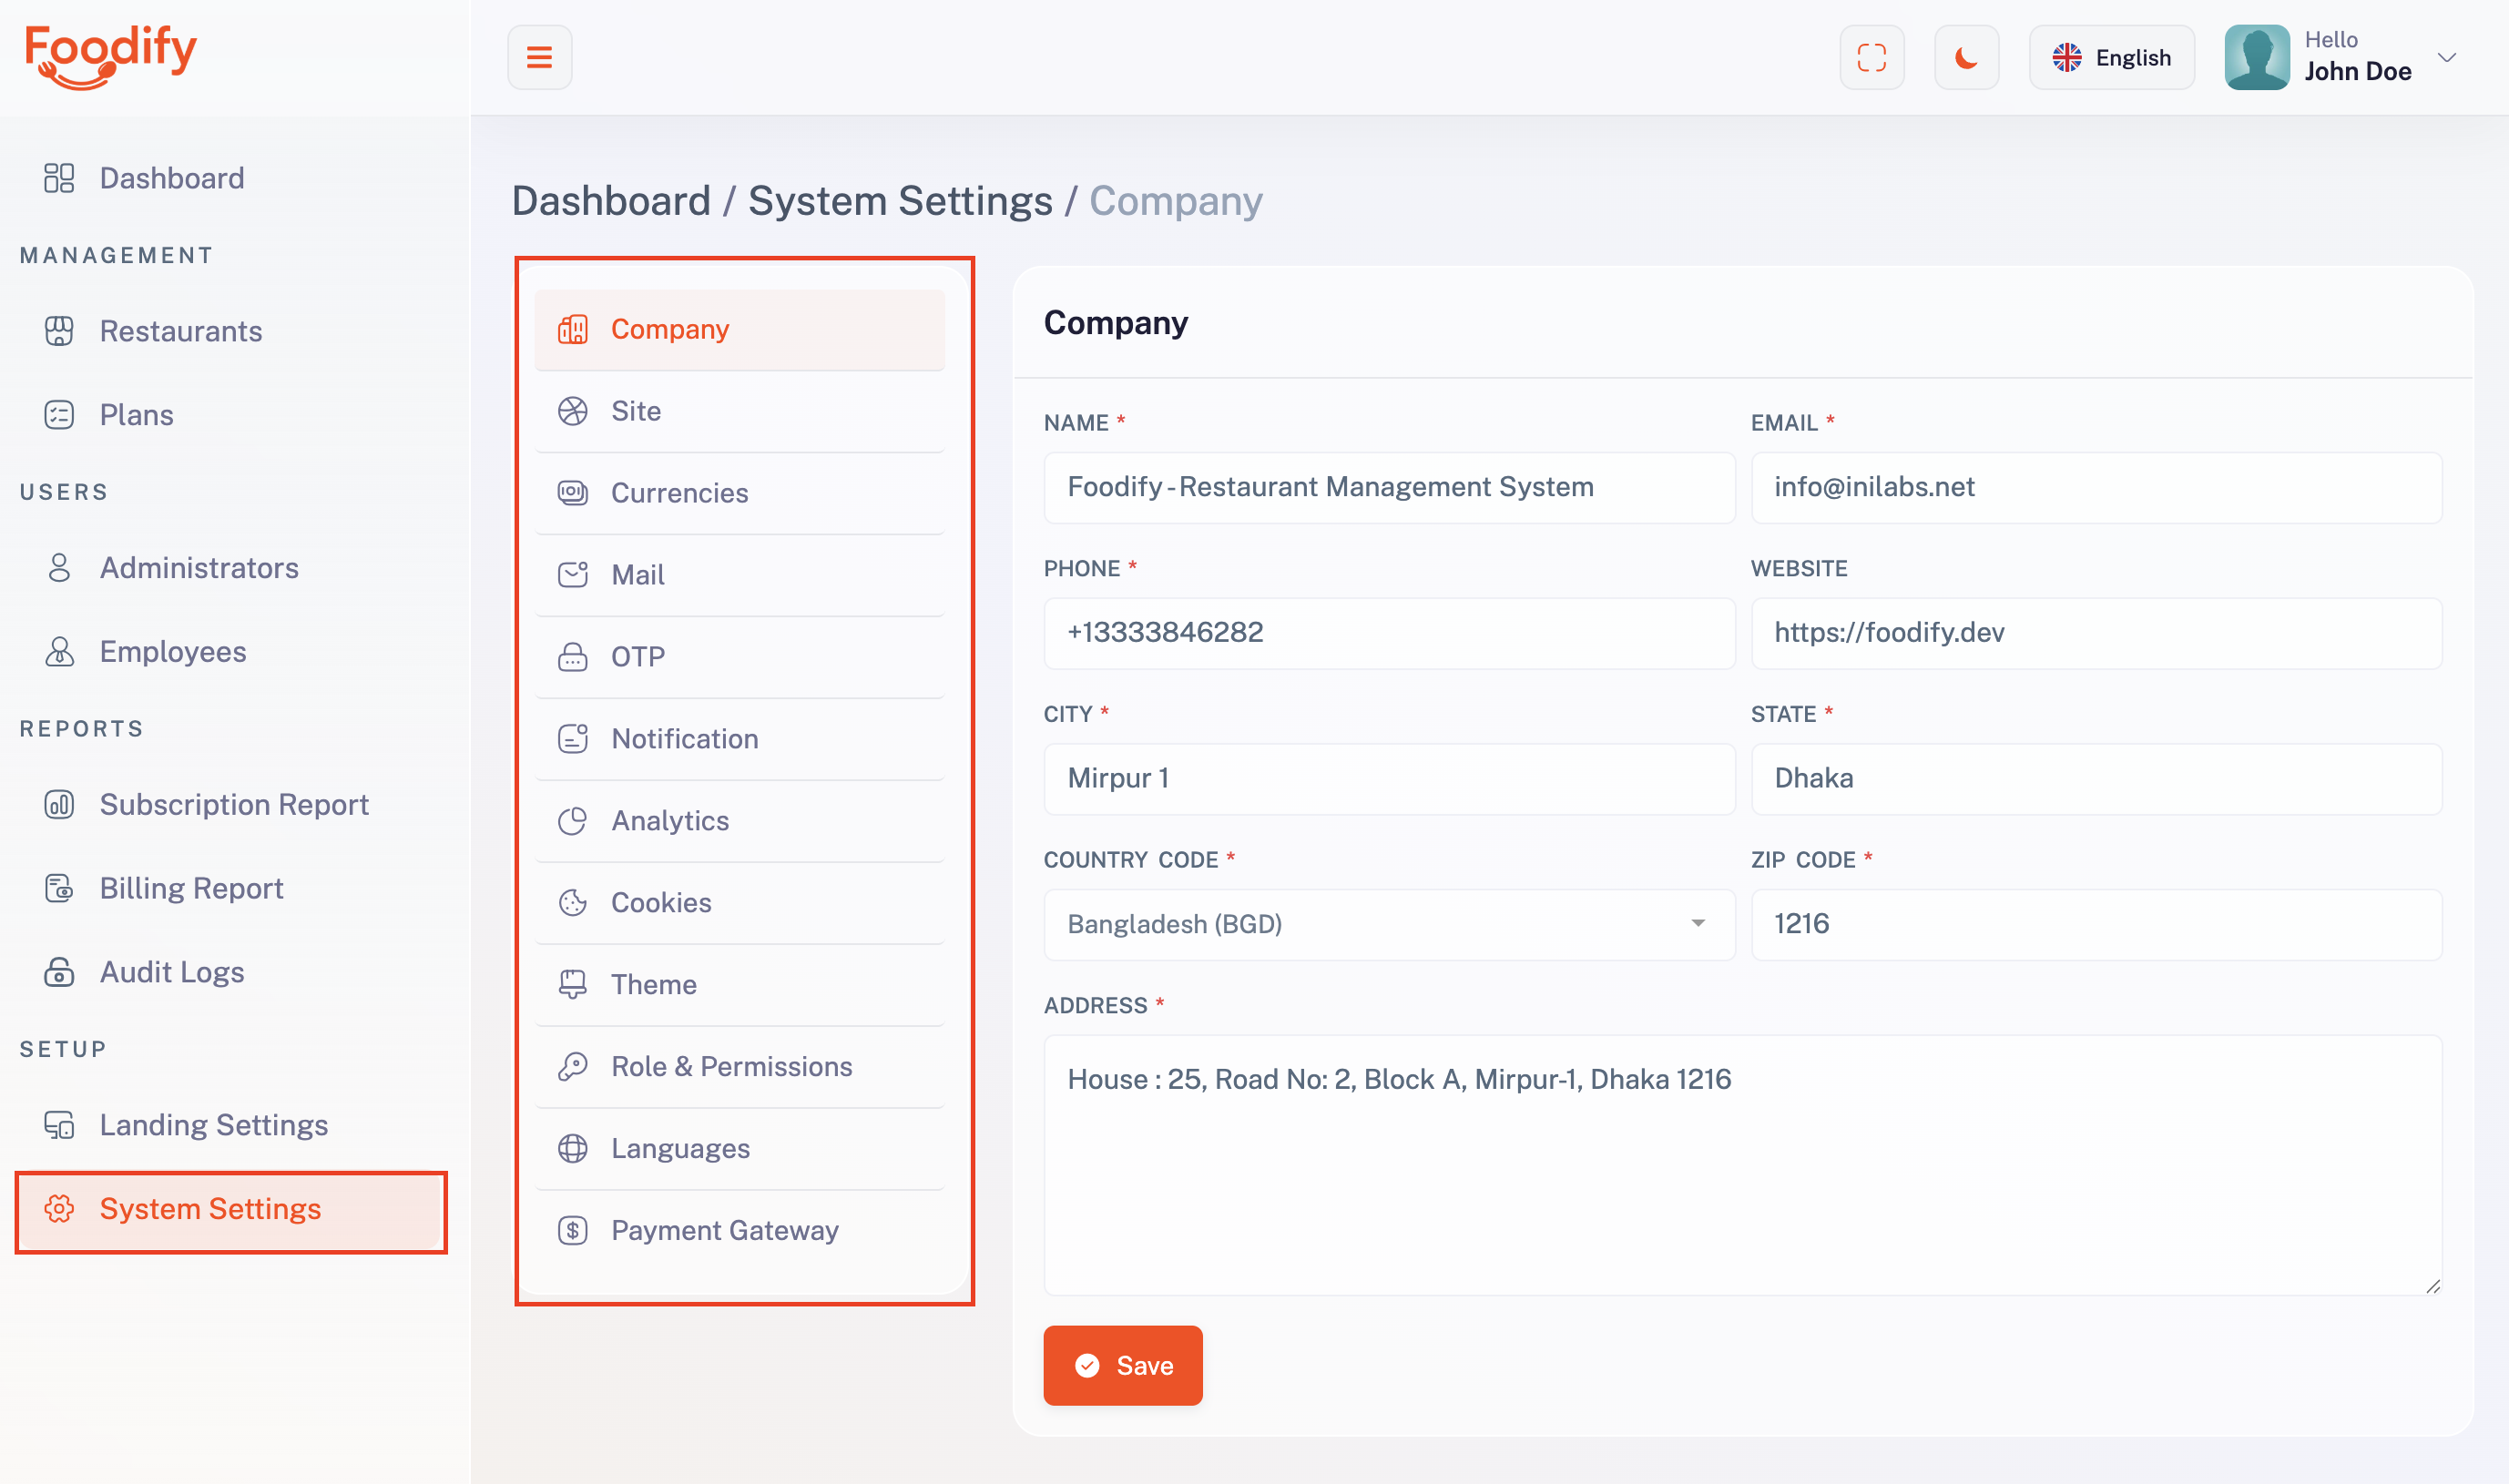
Foodify keeps configuration in two places, because one installation serves many restaurants.
System Settings belongs to the super admin and controls the whole platform. It covers Company, Site, Currencies, Mail, OTP, Notification, Analytics, Cookies, Theme, Role & Permissions, Languages and Payment Gateway (the gateway used to charge restaurants for their subscription).
Restaurant Settings belongs to each restaurant owner and applies only to their own restaurant. It covers My Restaurant, My Site, Pages, Currencies, Item Categories, Item Attributes, Taxes, Social Media, Sliders, Order Setup, Time Slots, Branches, Notification Alert, SMS Gateway and Payment Gateway (the gateways their customers pay with).
Tips Check our video tutorial! Watch Now
Landing Site Installation
The public marketing site — the one visitors see before they sign up — is a separate Nuxt 3 application. It is not part of the Laravel installation, and it is optional: if you already have a marketing site, you can point your sign-up buttons at the main app and skip this entirely.
Everything on the site — company name, logo, brand colours, plans, features, testimonials, FAQ, blog and CMS pages — is pulled from your Foodify backend through the landing API. You edit the content in the super admin panel, not in the code.
Prerequisite
- Node.js 18 or higher with npm.
- Your Foodify backend already installed and reachable over HTTPS.
- A domain or subdomain for the site, for example
www.yourdomain.comwhile the app runs onapp.yourdomain.com.
Step 1 — Install dependencies
Upload the landing folder to your server, then from inside it run:
npm installStep 2 — Configure the environment
Copy .env.example to .env and fill in five values:
NUXT_ENV=production
NUXT_PUBLIC_API_URL=https://app.yourdomain.com/api/landing
NUXT_PUBLIC_API_KEY=your-api-key
NUXT_PUBLIC_BASE_URL=https://app.yourdomain.com
NUXT_PUBLIC_ASSET_BASE_URL=https://www.yourdomain.com
What each value means
- NUXT_ENV — use
productionon a live server.developmentturns on API error logging and relaxes TLS checks, which is useful locally but not in production. - NUXT_PUBLIC_API_URL — your Foodify backend with
/api/landingon the end. This is where all the content comes from. - NUXT_PUBLIC_API_KEY — must match the
VITE_API_KEYvalue in your Laravel.env. The landing API rejects requests without it. - NUXT_PUBLIC_BASE_URL — the main app, not this site. The Login and Start Free Trial buttons point here.
- NUXT_PUBLIC_ASSET_BASE_URL — this site's own address, used to build absolute image URLs for social-media previews.
Careful BASE_URL and ASSET_BASE_URL are two different addresses. Swapping them sends visitors who click Login to the marketing site instead of the app.
Step 3 — Build and run
npm run build
npm run preview
The build output lands in .output/. On a real server, keep it running with a process
manager such as PM2 and put Nginx or Apache in front of it:
pm2 start .output/server/index.mjs --name foodify-landingTip
To host the site on plain shared hosting with no Node process, run npm run generate
instead. That produces static files you can upload — but the content is then frozen at build time, so
you must regenerate after editing anything in the admin panel.
Step 4 — Check it works
- Open the site. The header should show your company name and logo, not the defaults.
- Scroll to the pricing section — your plans should be listed with the right prices.
- Click Login. It must land on your main app, not back on the marketing site.
If the logo and plans are missing, the API URL or key is wrong. Open the browser console and look at the failing request.
Managing Landing Content
Once the site is running you never edit its code again. Everything is managed from Setup → Landing Settings in the super admin panel, and the site picks it up on the next page load.
What you can change
- Hero Section — the headline, sub-text and main image at the top of the page.
- Features — the feature cards describing what your platform does.
- Process — the "how it works" steps.
- Achievement — the counters (restaurants served, orders processed).
- Restaurant Type — the business types you cater for.
- Review — customer testimonials.
- Partner — partner or client logos.
- FAQ — the questions and answers block.
- Blog — posts, each with its own page.
- CMS Pages — free-form pages such as Terms or Privacy Policy. They appear in the footer automatically.
Branding
The company name, logo, favicon and the two brand colours come from System Settings → Company and System Settings → Theme. The landing site reads them at runtime and applies the colours to buttons, links and highlights, so changing the theme colour in the admin panel re-brands the marketing site as well — no rebuild needed.
Pricing
The pricing section lists the same plans restaurant owners see when they subscribe, taken from Plans. A paid plan with no price for the selected billing cycle is hidden automatically, so a monthly-only plan will not appear under the yearly toggle. Keep the Short Tagline filled in — it is the line shown under the plan name on the card.
Note
If you used npm run generate for static hosting, content changes will not appear until you
run the command again and re-upload. With npm run build and a running Node process, they
appear immediately.
Subscription Setup (Stripe)
Foodify charges restaurant owners for their plan through Stripe. This is separate from the gateways a restaurant's own customers pay with — those are configured by each restaurant owner under Restaurant Settings → Payment Gateway. The steps below are for you, the platform owner.
Important Until these steps are complete, restaurant owners cannot buy a paid plan. Every restaurant stays on the free plan.
Step 1 — Get your Stripe API keys
- Create an account at dashboard.stripe.com and sign in.
- Use the Test mode toggle while you are setting things up, and switch to live only when you are ready to take real money.
- Go to Developers → API keys.
- Copy the Publishable key (starts with
pk_) and the Secret key (starts withsk_).
Step 2 — Save the keys in Foodify
- Log in as super admin and go to System Settings → Payment Gateway.
- Paste the publishable key into Stripe Public Key and the secret key into Stripe Secret Key.
- Set Stripe Mode to Sandbox while testing, or Live for real payments.
- Set Stripe Status to Enable.
- Leave Stripe Webhook Secret empty for now — you will get it in the next step.
- Click Save.
Step 3 — Create the webhook endpoint
Stripe needs to tell Foodify when a payment succeeds, a plan renews or a card fails. Without this, a restaurant can pay and still not receive their plan.
- On the same System Settings → Payment Gateway page, find Stripe Webhook URL at the bottom and click Copy.
- In your Stripe dashboard go to Developers → Webhooks and click Add endpoint.
- Paste the copied URL into Endpoint URL.
- Under Select events, choose Select all events (or at minimum the
customer.subscription.*,invoice.*andcheckout.session.*groups). - Click Add endpoint.
Warning
Always use the URL from the Copy button. The path must end in
/api/stripe/webhook. If you type it by hand and leave out /api, Stripe will
still report 200 OK for every event, but plans and invoices will never be recorded — a failure
that is very hard to spot.
Step 4 — Save the signing secret
- Open the endpoint you just created in Stripe.
- Under Signing secret, click Reveal and copy the value (starts with
whsec_). - Back in System Settings → Payment Gateway, paste it into Stripe Webhook Secret and click Save.
Note This secret is what proves an incoming request really came from Stripe. Leaving it empty means anyone who knows your webhook URL could send fake payment events, so do not skip it.
Creating Subscription Plans
A plan decides what a restaurant can use and what it costs. Each paid plan exists in two places: the price lives in Stripe, and the features and limits live in Foodify. The two are linked by a Price ID.
Step 1 — Create the product and prices in Stripe
- In your Stripe dashboard go to Product catalogue → Add product.
- Give it a name that matches your plan, for example Standard.
- Add a recurring price, set the amount and choose Monthly. Save it.
- Add a second recurring price on the same product, set the yearly amount and choose Yearly.
- Copy both Price IDs (they start with
price_). You need one for monthly and one for yearly.
Careful
Copy the Price ID, not the Product ID. A Price ID starts with price_; a Product ID
starts with prod_.
Step 2 — Create the plan in Foodify
- Go to Plans in the sidebar and click Add Plan.
- Enter the Name and a Short Tagline.
- Set Plan Type to Paid. The price fields appear.
- Enter the Monthly Price and Annual Price. These must match the amounts you set in Stripe.
- Paste the two Price IDs into Stripe Monthly Price ID and Stripe Annual Price ID.
- Tick the Modules this plan unlocks — POS, QR table ordering, KDS, delivery, reports and so on.
- Set the Limits: how many branches, menu items, moderators and online orders per month. Tick Unlimited where you do not want a cap.
- Save.
As you type the annual price, Foodify shows how much a yearly subscriber saves compared with paying monthly, so you can price the discount deliberately.
What the modules and limits control
Each plan is built from two lists. Modules switch whole features on or off, and Limits cap how much of something a restaurant can create.
Modules
- Order Management — the online storefront and the Online Orders screen.
- POS Orders — the counter terminal, table view and cash register.
- Table ( QR Menu ) — dining tables, QR codes and guest self-ordering.
- Delivery Management — delivery boys, assignment and delivery tracking.
- Reporting & Analytics — sales, items and credit balance reports.
- Kitchen Display System — the kitchen ticket board.
- Order Status Screen — the customer-facing token display.
A module left unticked is hidden from that restaurant's menu entirely.
Limits
- Branch — how many outlets the restaurant may open.
- Moderator — how many staff accounts with moderator access.
- Menu Item — how many items the menu may hold.
- Online Order — how many online orders per billing month.
Tick Unlimited to remove a cap. When a restaurant reaches a limit, they are prompted to upgrade instead of being blocked without explanation.
The free plan
Every new restaurant starts on the free plan. Set which plan that is under System Settings → Site → Default Plan. A free plan has no price and no Stripe Price IDs — only modules and limits. Keep it generous enough to be useful, but limited enough that growing restaurants have a reason to upgrade.
Tip
Test the whole flow in Stripe test mode before going live. Use card number
4242 4242 4242 4242 with any future expiry and any CVC, buy a plan as a restaurant owner,
and confirm the subscription appears under Subscription Report.
Firebase Push Notification Setup
To use firebase follow the procedure which are mentioned below
- Go to this URL to create a project https://console.firebase.google.com/u/0/. If you already have a project, continue with that.
- Then go to Project Settings and create an app.
- In Project Settings > General > "your created app", you will find apiKey, authDomain, projectId, storageBucket, messagingSenderId, appId, measurementId.
- Click on "Cloud Messaging". There you will find a button named "Generate key pair". Click it to get the KEY PAIR.
- Now in Project Settings, click "Service Account". There you will find a "Generate new private key" button. Click this button to get a JSON file.
- Then go to your "Foodify" admin Dashboard > System Settings > Notification. Enter your credentials and save them.
- Now it's done.
Tips Check our video tutorial! Watch Now
How to configure multiple languages?
Translate your admin and website, follow these steps:
- Login into the admin panel.
- Go to System Settings -> Languages.
- Click On Add Language.
- Fill all field and add new language.
- Click on the view icon of the new language low in from the list.
- Select file from the dropdown option under Files tab and click get file content.
- All the lebels and language objectives will appear in the bottom of the field.
- Now update the value of all the input fields and click save.
- You do not change any word under the curly bracket text {}, example
{name}. - When all language is changed then run some command in your terminal or ssh panel.
npm install
npm run build
Merchant Mobile App
Foodify ships with a Flutter merchant app that puts the restaurant in the owner's pocket — a live dashboard, online and POS orders through to delivery, sales reports with a payment breakdown, and branch switching in a tap.
Setting it up is a separate job from the web installation: you configure it in Flutter, then build and release it to the stores. That whole process has its own guide.
Guide Open the Merchant App documentation → — prerequisites, logo and icon, app name, license key, base URL, Firebase push and the Android/iOS build steps.
Key Features Detailed
Foodify is a complete restaurant management platform. One installation serves many restaurants, and each one gets its own branches, menu, staff, customer website and POS terminal.
- Point of Sale (POS): Full counter terminal for dine-in, takeaway and delivery with running bills, KOT rounds, split payments and receipt printing.
- QR Menu Ordering: Guests scan the QR code on their table, browse the live menu and place orders themselves — no app install and no waiting for a waiter.
- Kitchen Display System (KDS): Kitchen-side ticket board driven by KOTs, with per-item cooking status so chefs work from the screen instead of paper.
- Order Status Screen (OSS): Customer-facing display showing preparing and ready token numbers.
- Online Ordering: Each restaurant gets its own storefront for delivery and pickup, including scheduled (advance) orders.
- Multi-Branch Management: Run several outlets under one restaurant account, each with independent tables, kitchens, staff and reporting.
- Areas & Kitchens: Group tables into areas (Ground Floor, Terrace) and route items to the right kitchen station so each KOT prints where it is cooked.
- Staff Roles: Waiters, chefs, delivery boys, moderators and administrators, each with their own permissions and branch scope.
- Subscription & Plan Control: Sell monthly or yearly plans that switch modules on or off and cap branches, menu items, moderators and online orders.
- Cash Register & Accounting: Open and close shift sessions with counted cash, automatic cash-sale logging, manual cash in/out and instant variance.
- Real-time Reporting: Sales, item performance, credit balance and transactions, plus subscription and billing reports on the platform side.
- Multi Payment Gateways: 12 online gateways plus cash on delivery for customer orders, and Stripe for platform subscriptions.
- Coupons & Offers: Percentage or fixed-amount discount codes with usage limits and date ranges, plus scheduled offers on selected menu items.
- Multi Language & RTL: Ships with English, Bengali, Arabic and German; right-to-left layout is fully supported.
- Notifications: Order updates by email, SMS and Firebase push notification.
- Audit Logs: A record of who changed what and when across settings, plans and orders — useful when several people manage the platform.
- Landing Page Builder: Edit the public marketing site — hero, features, pricing, testimonials, FAQ and blog — from the super admin panel.
POS & KOT — Dine-In Workflow
Foodify's dine-in POS works on a running bill: one order stays open for the whole sitting and guests are billed once at the end.
- Open the register. POS requires an active cash register session for the branch. Enter the opening balance to start the shift.
- Pick a table. The Table View hub shows every table grouped by Area and colour-coded by status. Set the pax (number of guests) and assign a waiter.
- Fire the first KOT. Add items to the cart, then press KOT. Foodify creates a Kitchen Order Ticket and — because every item is assigned to a Kitchen — splits the round automatically, so the grill items go to the grill station and the bar items to the bar, each with its own ticket number and printer.
- Add more rounds. Each later round is a new KOT on the same order, with its own timestamp.
- Discount (optional). Apply an order-level discount as a percentage or a fixed amount. It is recalculated automatically as the bill grows, and tax is adjusted proportionally.
- Take payment. Choose Full or Split. Full payment offers a numpad with quick denominations and shows change to return. Split allows equal 2/3/4 ways or custom amounts, mixing Cash, Card, Mobile Banking and Other on the same bill.
- Table frees itself. Completing payment marks the order paid, logs any cash line to the register and releases the table for the next party.
Tips Other useful POS actions: Change Table to move a party, Recent Orders to reopen an unpaid order, per-item notes for special instructions, and New Order to reset the terminal.
QR Menu Ordering — Setting It Up
Guests scan a QR code at their table, browse the live menu and order without waiting for a waiter. The setup runs top-down:
- Create Areas. Under My Restaurant → Areas, add the zones of the outlet — Ground Floor, Terrace, Private Room. Areas group tables on the Table View screen.
- Create Kitchens. Under My Restaurant → Kitchens, add each cooking station — Grill, Bar, Dessert. Every menu item is assigned to one, which is how a single order splits into separate KOTs per station.
- Create Dining Tables. Under My Restaurant → Dining Tables, add each table with its area and seating capacity.
- Print the QR codes. Each table has its own QR code — download it from the table list and place it on the table.
- Guests order. Scanning opens that table's menu. Orders arrive in POS & Orders → Table Orders for staff to approve.
- Staff approve and fire. Approving sends the items to the kitchen as a KOT, exactly as if they had been entered at the counter.
Note Guest orders need approval before reaching the kitchen, so nothing is cooked by mistake. Waiters can also be called from the table, and those requests appear in the bell menu of the admin header.
Order Management Lifecycle
Orders placed on the customer website follow this lifecycle:
- Pending — the customer completes checkout (delivery or pickup, now or a scheduled time slot) and pays online or selects cash on delivery. The order lands in Online Orders.
- Accepted — staff review and accept the order, which confirms it to the customer and starts preparation.
- Preparing / Prepared — KOTs go to the kitchen screens; as the kitchen works, the order status follows the tickets.
- Out for Delivery — a delivery boy is assigned and picks the order up. For takeaway, use Add Token on the order and it appears on the Order Status Screen for collection instead.
- Delivered — the order is completed and appears in sales reports.
- Canceled / Rejected / Returned — available for orders that do not complete normally.
The customer is notified at each step by email, SMS and push notification, based on what you enable in Restaurant Settings → Notification Alerts. Delivery charges are configured under Order Setup — a base charge, a per-kilometre rate and a free-delivery radius.
Troubleshooting
If something is not working, the application log is the fastest way to find out why. It lives at
storage/logs/laravel.log — open it and read the last entries.
Subscriptions are not working
A restaurant paid, but the plan was not applied. Check Developers → Webhooks in your Stripe dashboard and open the endpoint.
- Every event shows 200 OK, but nothing is recorded in Foodify. The endpoint URL is almost
certainly missing
/api. Edit the endpoint and use the exact URL from the Copy button on the Payment Gateway page. - Events show 500. Open
storage/logs/laravel.log. If you see "No API key provided" or "Invalid API Key", your Stripe Secret Key is missing or wrong under System Settings → Payment Gateway. Save the correct key, then runphp artisan config:clear. - Events show 400. The signing secret does not match. Reveal it again in Stripe and paste it into Stripe Webhook Secret.
- Checkout does not open at all. The plan is missing its Stripe Price ID, or the ID belongs to a different Stripe account than the keys you saved.
After changing any key, always run php artisan config:clear so the new
value is picked up.
Permission and file errors
Errors such as "failed to open stream: Permission denied" or "The stream or file could not be opened" mean the web server cannot write to a folder.
- Set
storageandbootstrap/cacheto 755 recursively. - Make sure they are owned by the web server user (often
www-dataon Linux, or your cPanel account user). - Uploaded images do not appear. The storage symlink is missing. Run
php artisan storage:link, or create a symlink frompublic/storagetostorage/app/publicfrom your file manager.
Blank page or 500 error
A completely white page means PHP stopped before it could render anything.
- Open
storage/logs/laravel.logand read the last entry — it usually names the problem directly. - To see the error in the browser instead, set
APP_DEBUG=truein.envtemporarily. Set it back to false once you are done, otherwise visitors can see your configuration. - Confirm your
.envfile exists and contains the correct database credentials. - Clear the caches:
php artisan config:clear
php artisan cache:clear
php artisan view:clear
If the site worked before you edited .env, the cached configuration is
usually the cause — config:clear fixes it.
Language or layout problems
- A new language shows raw keys such as
label.dashboard. Translations are compiled into the frontend, so after adding or editing a language you must rebuild:
npm install
npm run build- The admin panel looks unstyled after an update. The build output is stale. Run
npm run buildagain and hard-refresh the browser (Ctrl+Shift+R). - Right-to-left languages look wrong. Check that the language's Display Mode is set to RTL under System Settings → Languages.
Backups
Back up two things regularly — everything else can be restored from your purchase.
- The database. From cPanel use phpMyAdmin → Export, or from the command line:
mysqldump -u USERNAME -p DATABASE_NAME > backup.sql- The
storage/app/publicfolder. This holds every uploaded image — logos, menu photos and restaurant media. - Keep a copy of your
.envfile somewhere safe as well. It holds your database credentials and application key.
Warning Take a fresh backup before applying any update.
Changelog
Version 1.0 (14 February, 2026)
- - Initial Release